Working Instructions of MailsDaddy Office 365 Migration Tool
Simple steps to migrate Office 365 to Office 365 file format using MailsDaddy Tenant to Tenant migration tool. This O365 migration utility easily performs cross-over migration for Office 365.
O365 to O365 Migration (15 Steps)
Click on any screenshot to view full resolution.
Step 1: Complete Operation
Download, install ( Installation Guide ) the free demo version of MailsDaddy Office 365 Migration Tool. If you have purchased a license key then activate the full version of the Office 365 to Office 365 migration tool.
Step 2: Complete Operation
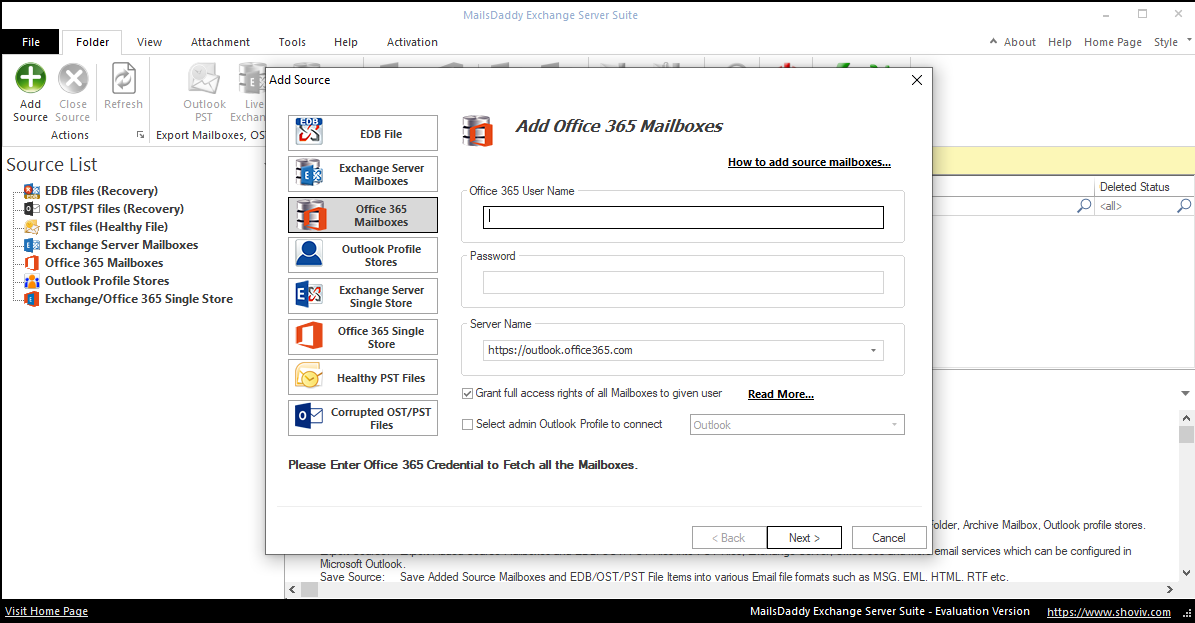
In the first Window, Add Office 365 source mailbox and click on OK button to fetch the mailbox structure into the software window.
Go to menu bar and click on Office 365 mailbox under multiple export mailbox group.
Go to menu bar and click on Office 365 mailbox under multiple export mailbox group.

Step 4: Complete Operation
User can also select the multiple Office 365 migration option by clicking on relevant folder.

Step 5: Complete Operation
Now a pop-up window appears on the software screen with two options: Check/Uncheck Sub Folder and Custom Folder Selection .

Custom Folder option is used to include and exclude folders from the thousand mailboxes.
Custom Folder option is used to include and exclude folders from the thousand mailboxes.

Step 6: Complete Operation
The next popup window has two options: fetch mailbox from configured Outlook profile and fetch all mailboxes from Office 365.

Enable second option and fetch mailbox from the online address of Office 365
Enable second option and fetch mailbox from the online address of Office 365. Type: Email of O365, Password, Server Name and Grant full acces then click on Next button.

Mapping window allows you to map the destination point using CSV file or manually
Mapping window allows you to map the destination point using CSV file or manually. Manually the user has to select the source mailbox and then click on Map Source button. To verify the existing mailbox or address type target then Validate it. (Note) : The exported CSV file is used for future reference when you map manually.

Filter dailoug box lets the user select Message class-wise
Filter dailoug box lets the user select Message class-wise
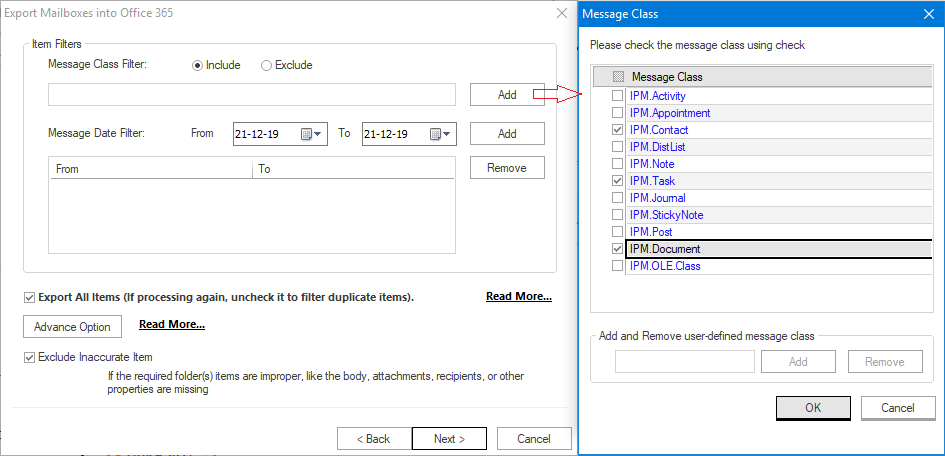
Add data between two different time period and migrate O365 to Office 365
Add data between two different time period and migrate O365 to Office 365. Export all items : Uncheck the box, if duplicate items through an error during the migration. Exclude inaccurate item : With EDB file, user can filter the inaccurate item from the source.

Step 8(ii): Complete Operation
Advanced : Multiple features container: User thread count : Speed up the thread count from 1 to 50 (by default it is set to 30) Apply Filter Using : Multiple option::Last modification time, Message creation time, Message delivery time, Client submit time. Process hard deleted Items : Recover deleted items for Office 365.

Step 8(iii): Complete Operation
Folder Mapping: Map folder to folder or source folder to target folder before starting migration from Office 365 to Office 365. Click on Add button and type in the source and target folder name. Edit button is used to modify the folder name Remove button helps to delete added folder Import CSV button Mapping using a CSV file. Export CSV file for the future requirement.

Step 8(iv): Complete Operation
Email Translation: Create a new email address in the target and import source email data in it. It helps you to export email items with a new email address. Add : Use to change the address of the source folder Edit : Source folder or the target folder address. Remove : Source folder and the target folder. Export to CSV : Address mapping list save in CSV file. Import from CSV : Address of source and target mailbox map with CSV file.

Apply on Recipient too : Only works on the 'From' field of the email item
Apply on Recipient too : Only works on the 'From' field of the email item. Boost Item Fetching : Specially apply on the header of the emails with the data-wise migration option When you are done with the all options, click on the Next button to start Office 365 migration. The software also generates the report of Source Folder, Target Folder, Item Count, Filtered Items, Copied Items, and Process Item.

Ready to Start with Office 365 to Office 365 Migration?
Download the free trial version to preview all mailbox items or buy the full license for unlimited conversion.