Both Google Workspace and Office 365 are popular collaborative platforms, and migrating users and mailboxes between them is a common challenge. In this post, we’ll provide a step-by-step guide for migrating from Google Workspace to Office 365. There are two methods for this migration: an automated process and a manual approach.
Users can choose the method that best suits their needs and should ensure they read and understand the entire process before proceeding.
Google Workspace vs Office 365 (Exchange Online)
Google Workspace – This cloud platform is the incarnation of G-Suite which is a collection of all its valuable products and is available in different licenses. You can buy it for each user. It has almost all types of office applications that are used for daily work; you can see some of its useful applications in the picture below.
In technical terms, it is a collaborative platform that provides all the essential requirements to you and your team in one place.
Office 365 – It is known by many names like M365, O365, Exchange Online, etc. Many of our well-known applications are present in this, which have been used since 1990 and are also familiar to all. Apart from this; you can see some other useful applications in the picture below.
This small description will be of some help in knowing both platforms.
What can we move from Google Workspace to Office 365?
You should know that the flow of Gsuite to Office 365 migration can migrate the following items:
- Mail & Rules
- Contact
- Calendar
Contact Us
Contact us to migrate Google Workspace to Office 365 or vice versa. We provide expert data migration and ongoing support to ensure minimal disruption.
Cloud Migration Service
Limitations
According to Microsoft, here are some limitation points during the whole migration.
- Large single mail size limit 35MB (also depends on Transport configuration)
- Shared calendar and event colors will be not migrated
- A maximum of 3 email addresses will be migrated in one contact.
- Gmail tags, Custom tags, and contact URLs will be not migrated.
Pre-requisite for Google Workspace to Office 365 migration
We need to fulfill the O365 pre-requisite to export Automatic and Manual G-suite data to Office 365.
- Exchange Global Admin Account Access
- Google Workspace Super Admin Account Access
- Add domain in M365 platform
- Add user to M365 platform.
Add Domain and Users in Office 365 for Google Workspace migration
To start the migration to Exchange Online from Gsuite, we need to connect the domain first and then the user. So follow the below steps:
Connect Domain to Office 365
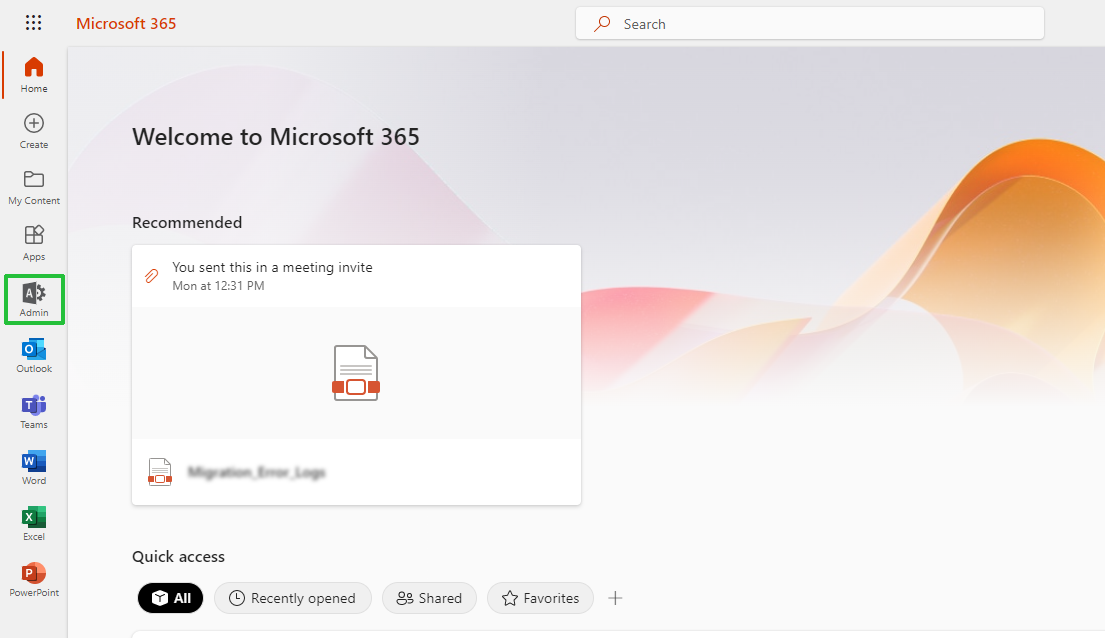
- Login to M365 Admin account > Click on Admin
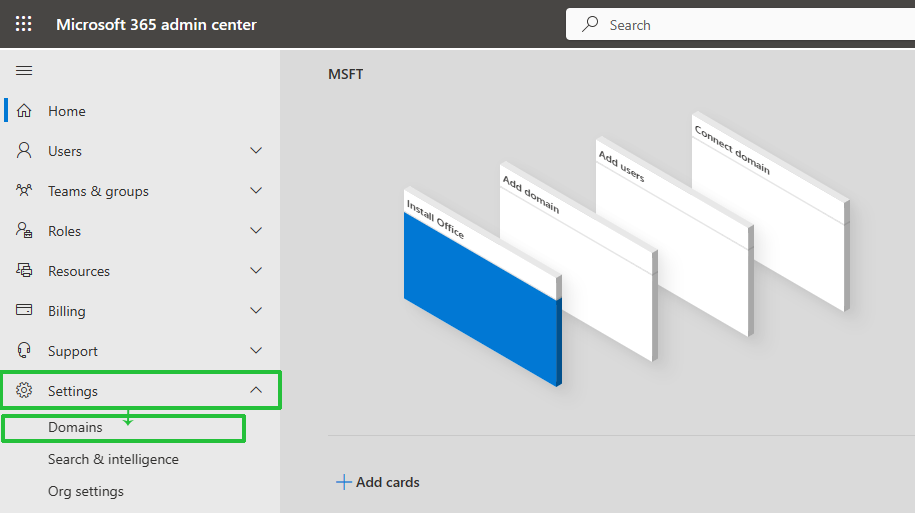
- In Microsoft 365 Admin center, click on Setting then choose Domain
- Press +Add domain

- Enter the domain name > Click on Use this domain button

- Verify your domain with one of the following options then click on verify

- In the connection panel, choose “Skip and do this later (not recommended)” then continue.
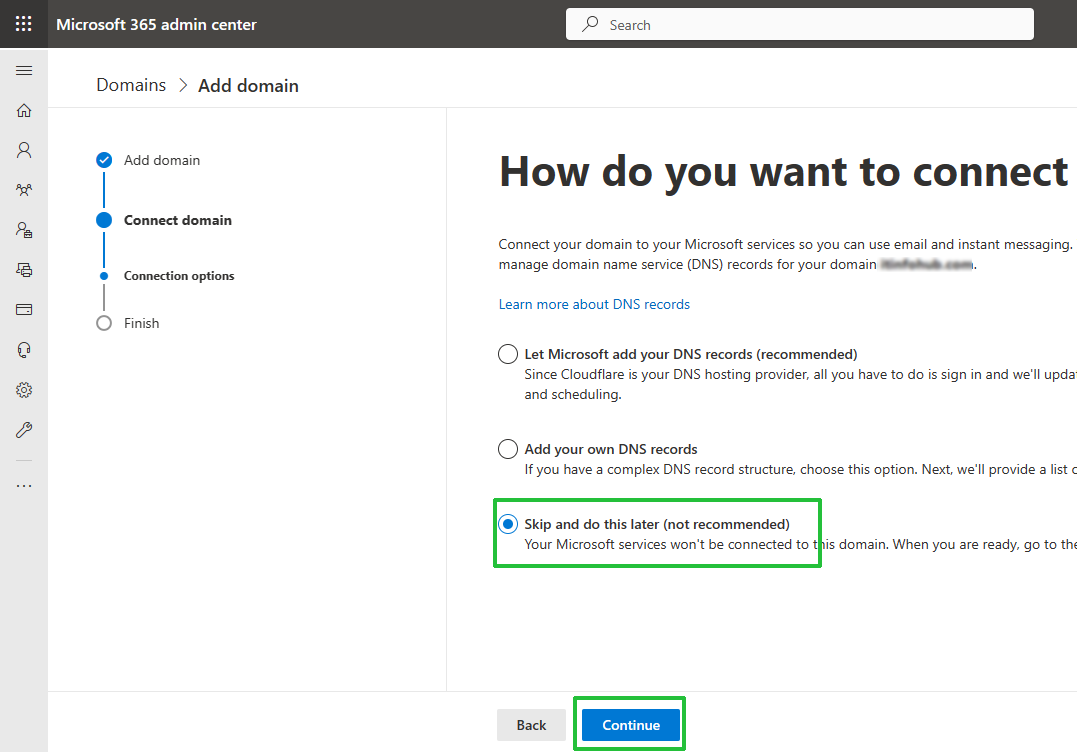
Note: We can manage the DNS record after the migration success so that mail routing has changed with it.
- When domain setup is completed, we can add the user for the recent domain connection.

Add user to Office 365 domain
- In m365 admin center, click on users >> Select Active users

- Click on Add a user >> Fill in the detail of the user: first name, last name, display name, username, and select the domain (if multiple domains are added).
- You can set automatic and manual passwords then click Next.


- Now select a location and assign a license in the new window then Next.

- You can assign the role to the user or skip this step and click Next.

- Check the complete information and click on finish adding.
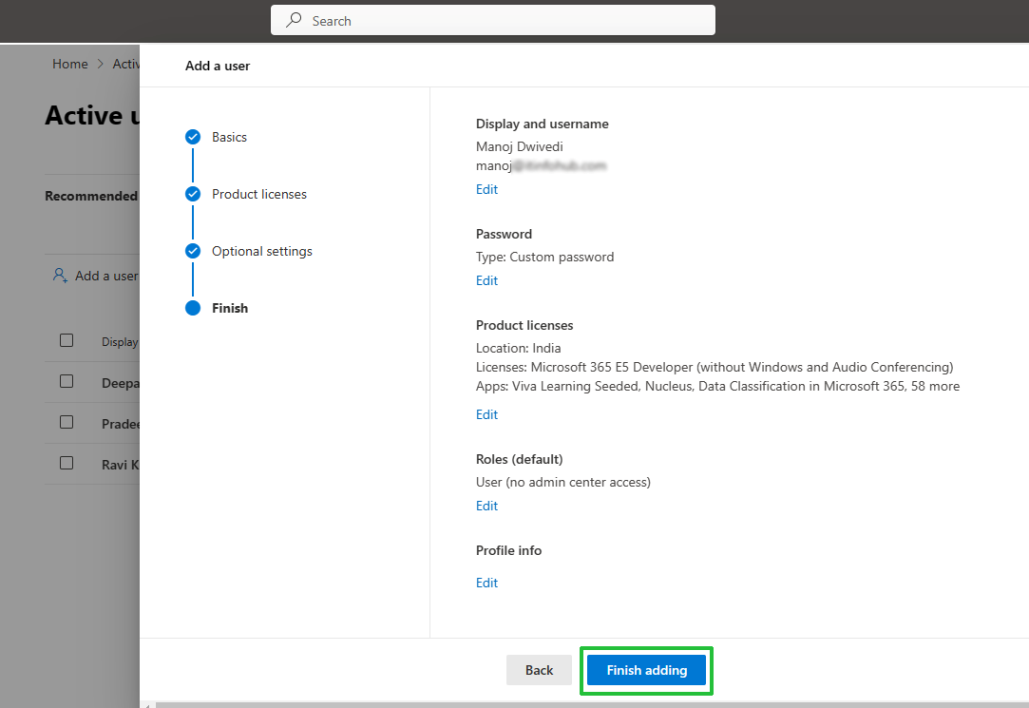
- Within a minute, you will see that the user is added to the active user’s list. >> Click on the Close button.
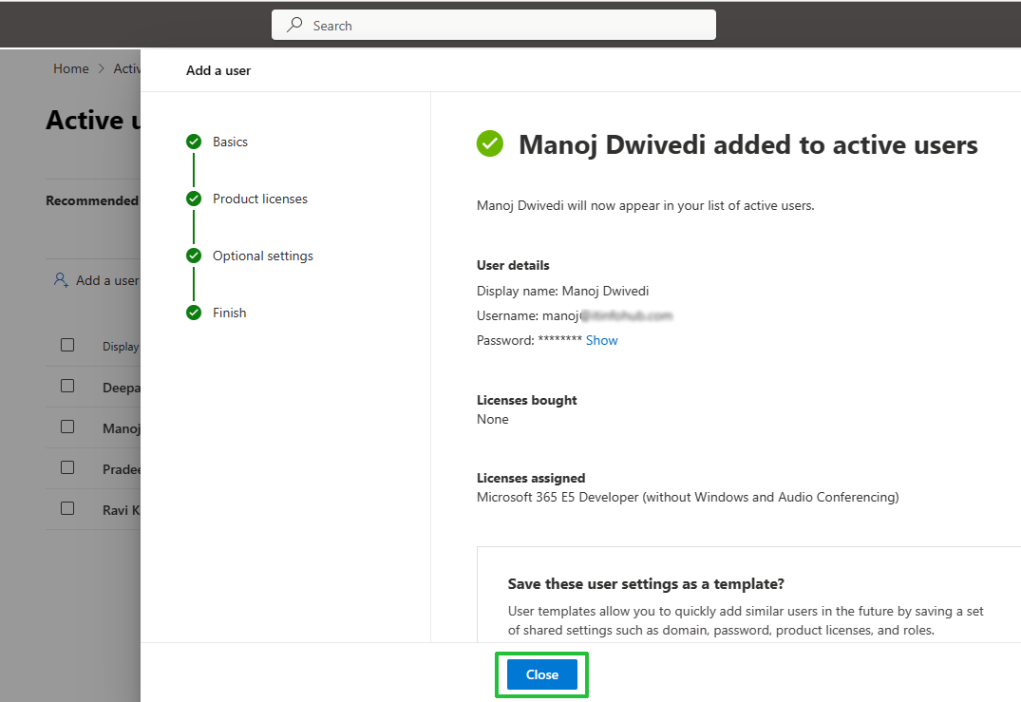
Now we can proceed for Gsuite to Office 365 migration.
Note: Once you have assigned all user corresponding domains, follow the above method and then move to the migration phase.
Guideline for Google Workspace migration to Office 365
Once you have done the domain connection and assigned the user, we can follow the below steps:
1st Step: Click on Show All and choose Exchange
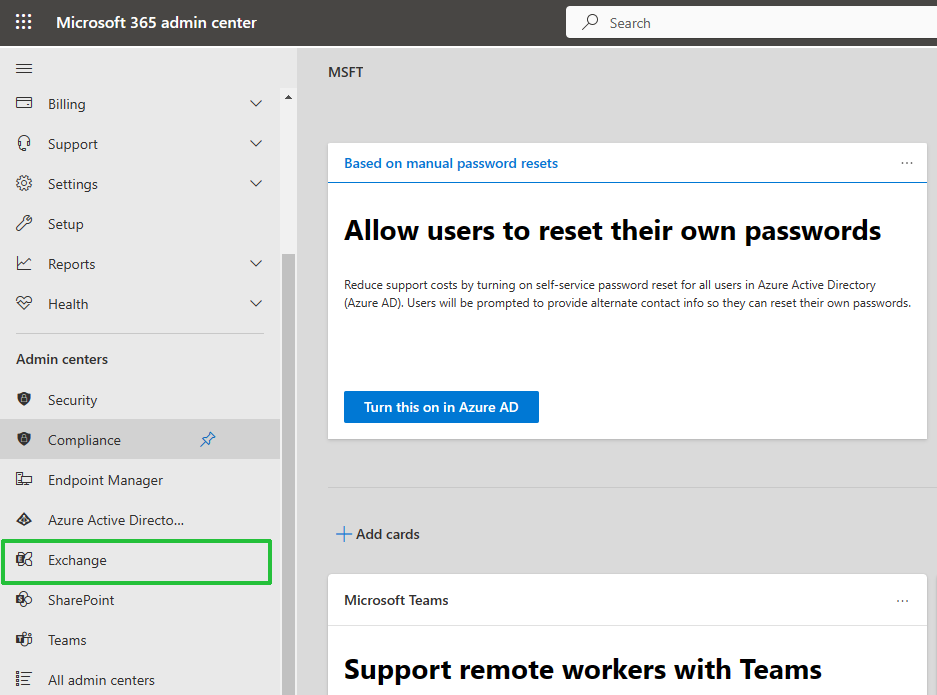
2nd Step: Your Exchange admin center panel will be opened >> Go to migration and click on Add-Migration batch
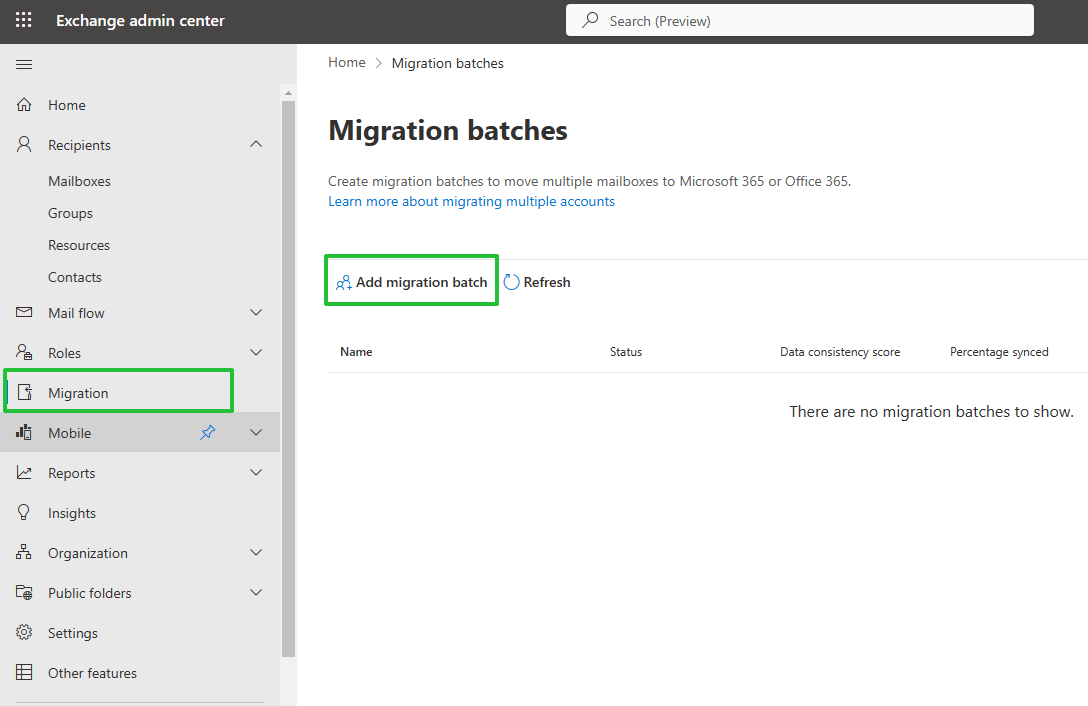
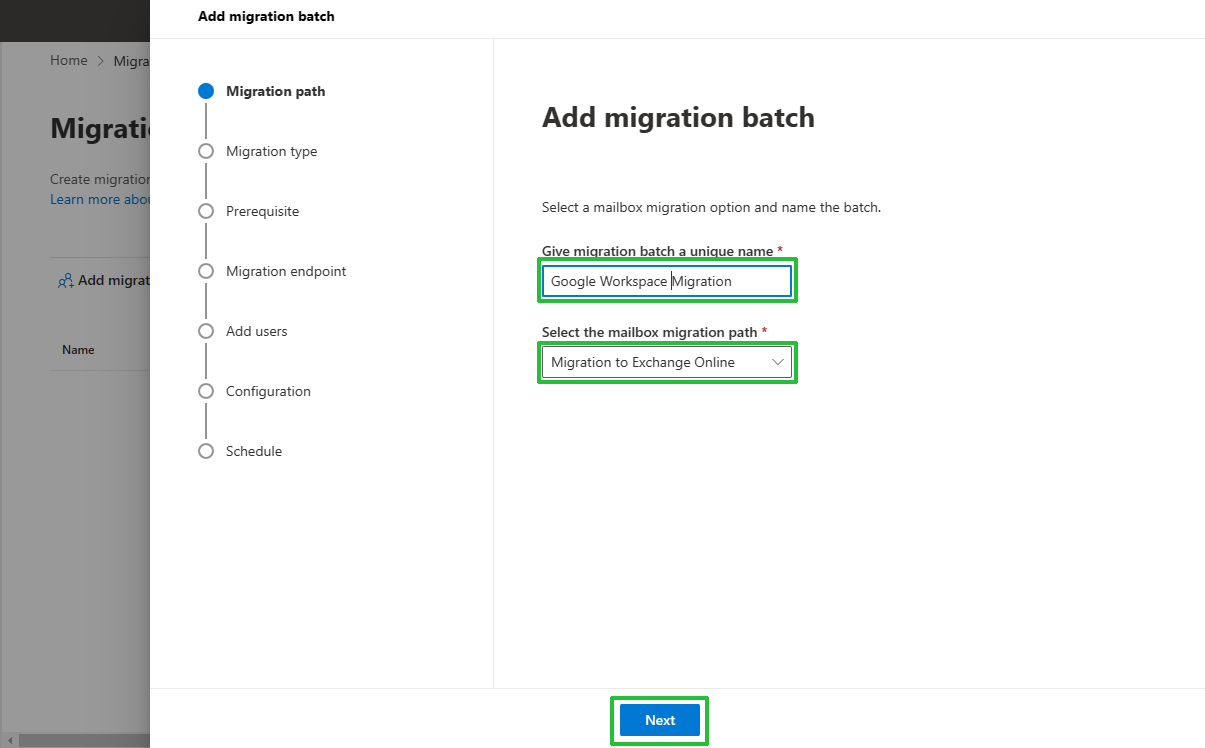
3rd Step: In Add migration batch wizard >> provide a unique name to the batch then choose Migrate to Exchange Online in select the mailbox migration path drop-down then Next.
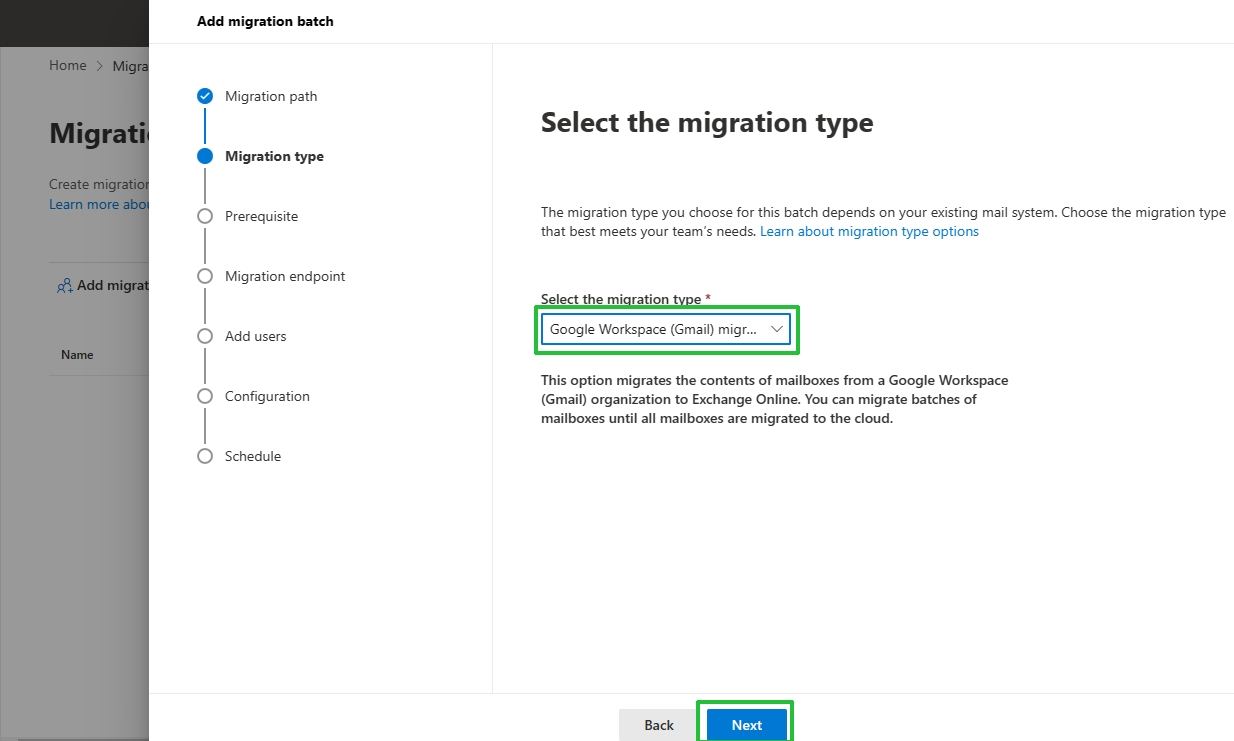
4th Step: In the new screen, choose Google workspace (Gmail) migration in the drop-down then Next.
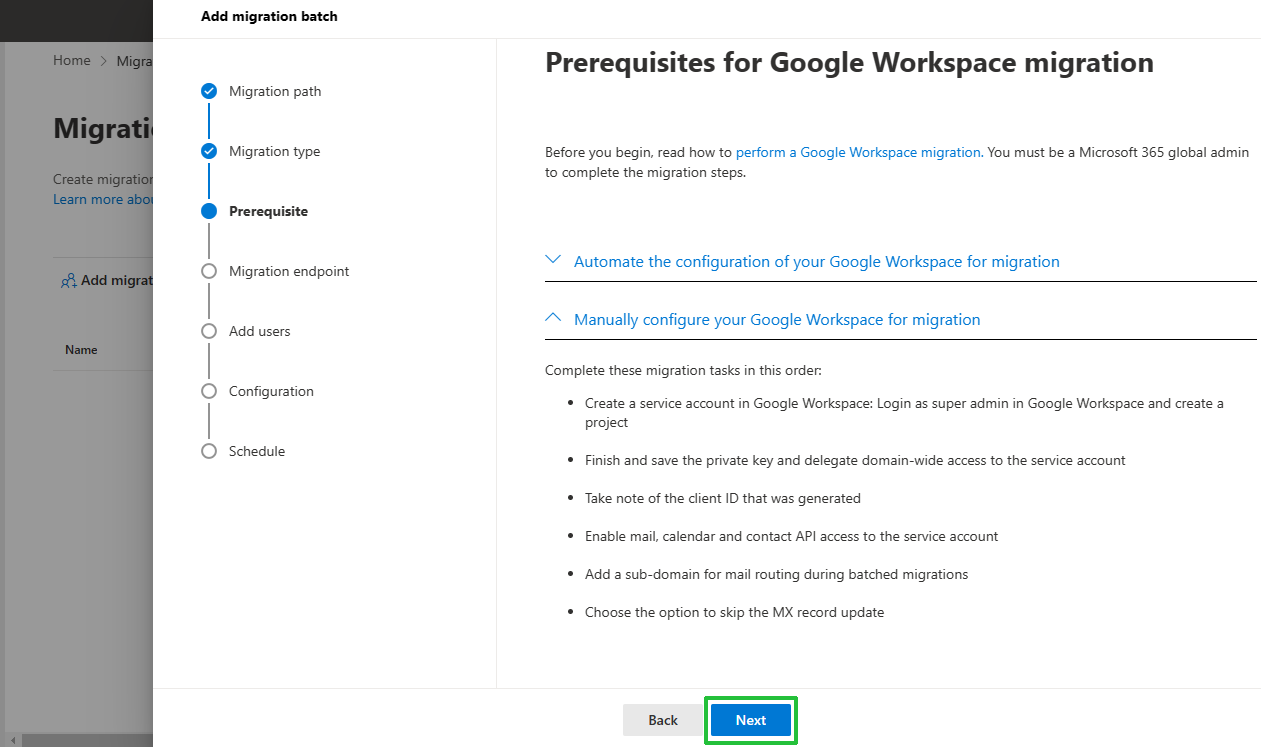
5th Step: In the pre-requisite screen, you will see two ways:
- Option 1: Automate the configuration of your Google Workspace for migration
- Option 2: Manually configure your Google Workspace for migration
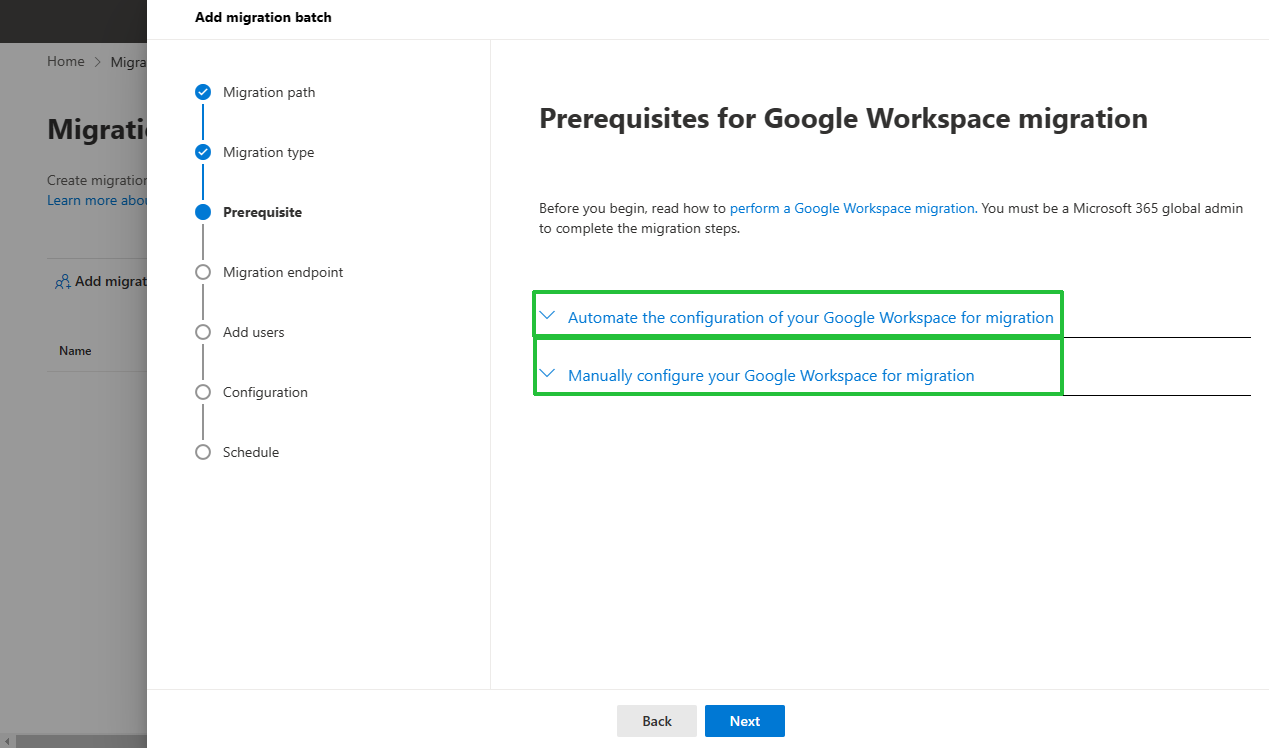
I will show you both ways to transfer your items from Google Workspace to Office 365 (Exchange Online).
Automate the Configuration steps for Google Workspace to Office 365 migration
- Expand and automate the configuration option by clicking on it and hitting the start button.
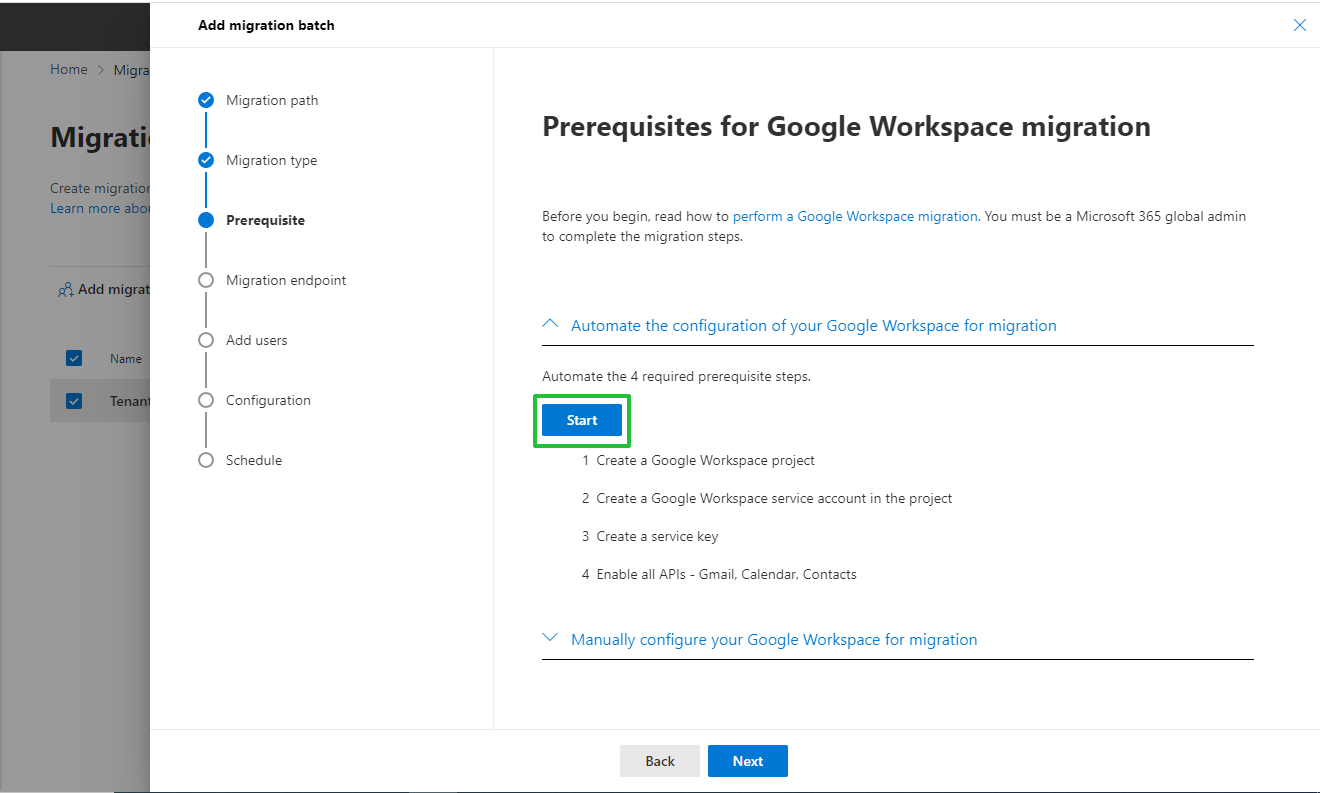
- Login to your G-suite Super Admin account with credentials to initiate the process.
- After enabling APIs, It automatically downloads the JSON file to your local system. Also, provide a link to add click ID and scope to GWS (Google Workspace) manually.
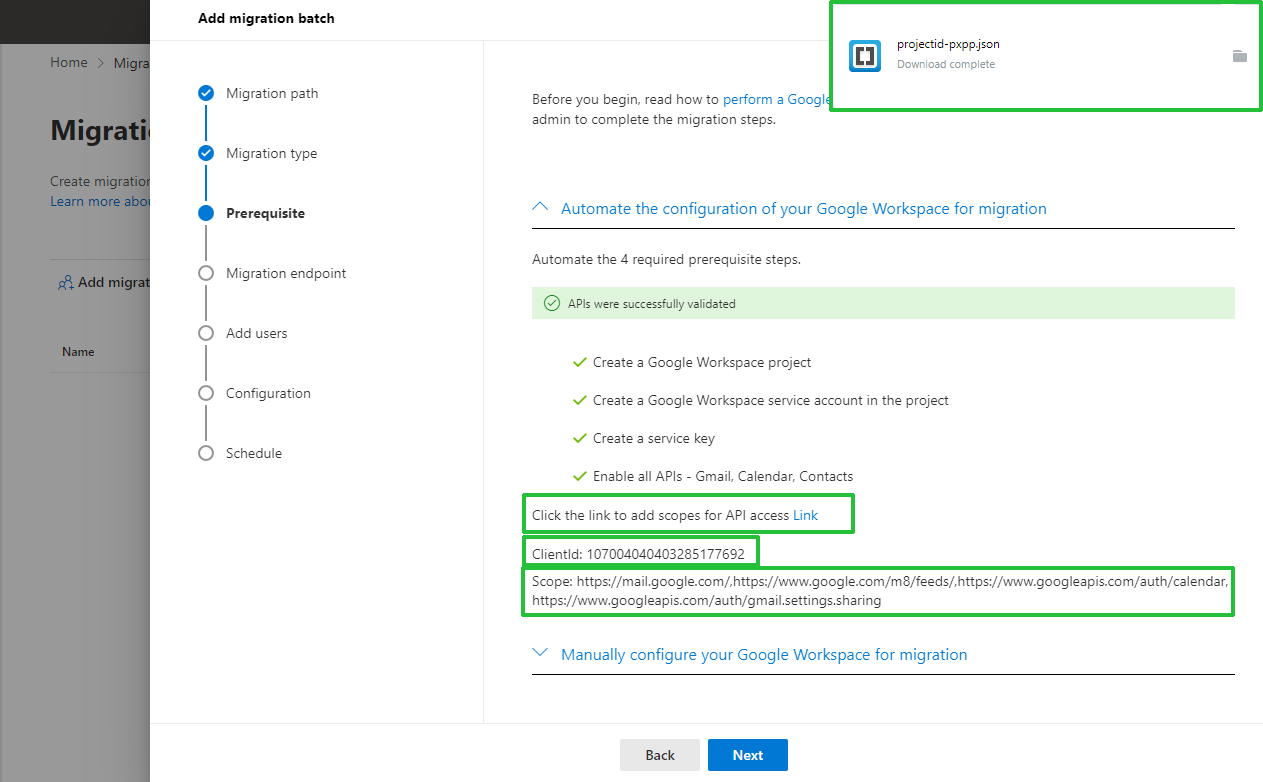
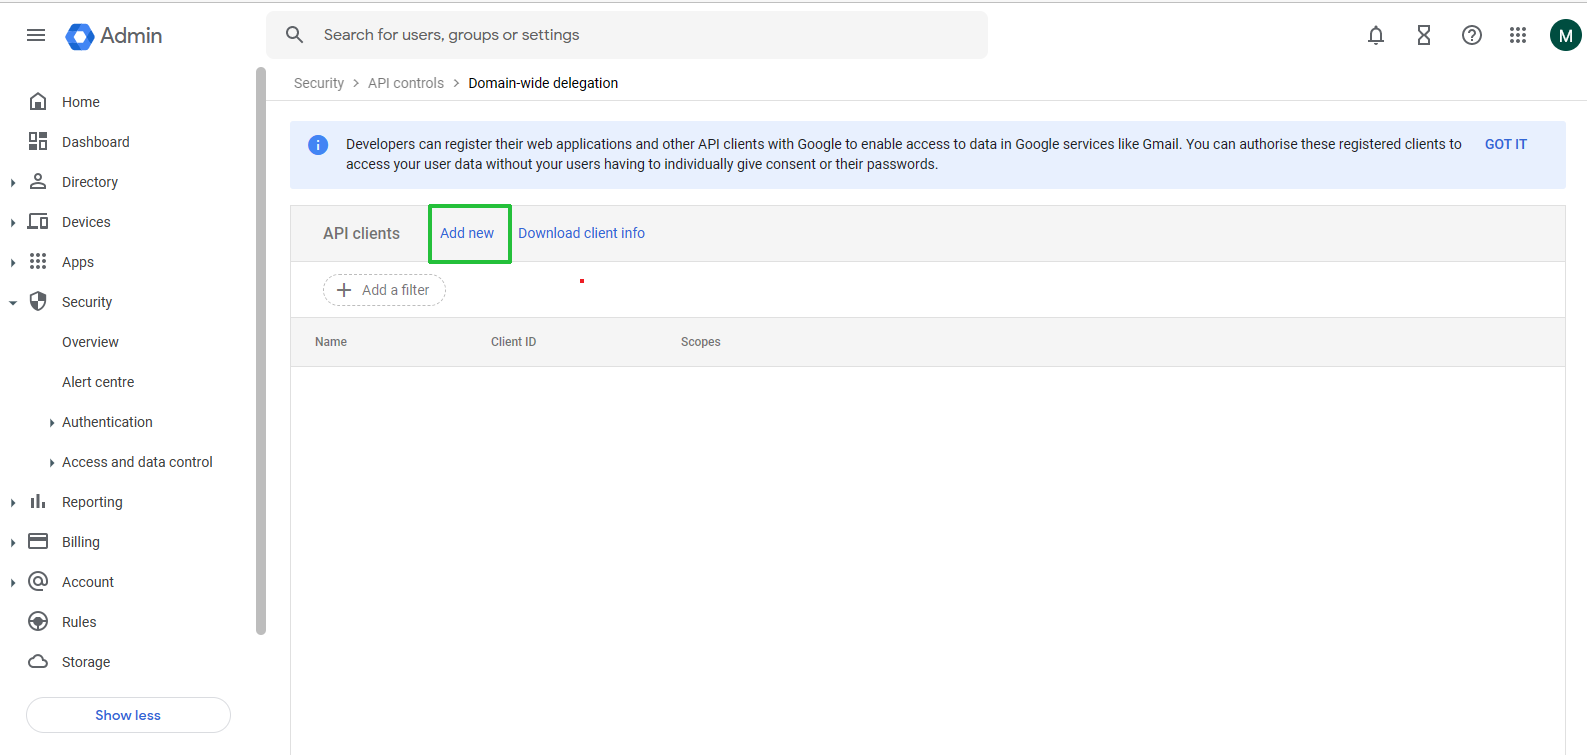
- Click on the link. It will be redirected to the Google Admin API controls page.
- Select Add new >> Copy the client ID and scope from EAC then paste it here and click on Authorize.
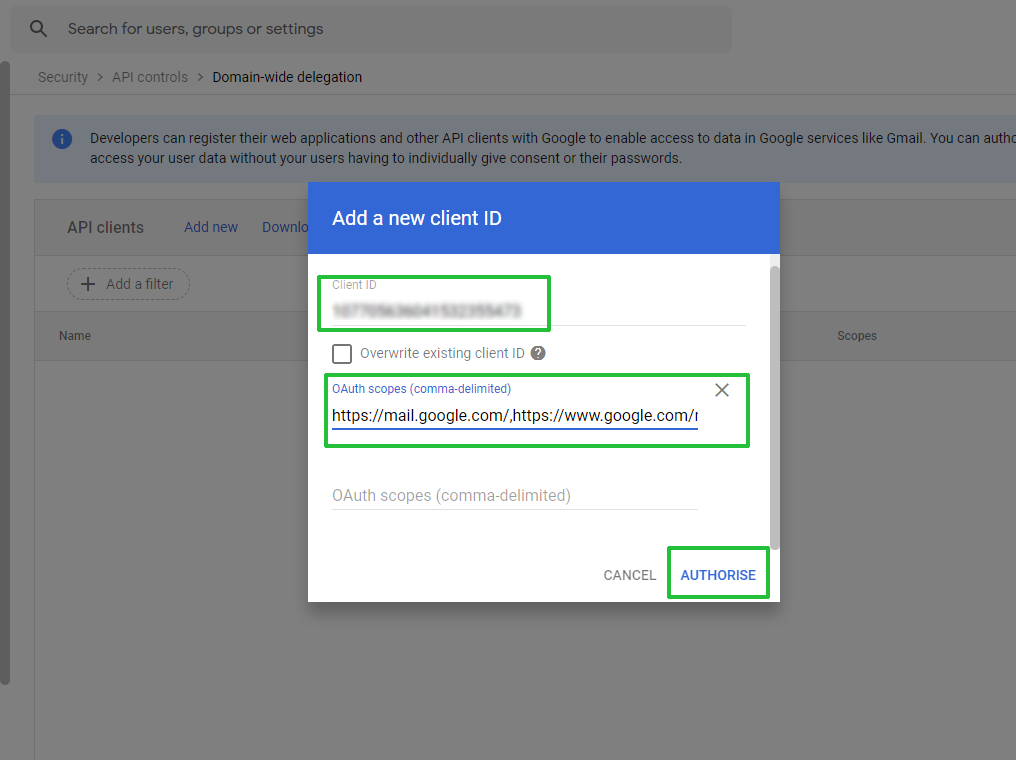
- Now back to the EAC panel and press the Next button.
- In the next screen, Click on Create
Note: If API permission is not enabled automatically then you have to manually enable it. You can see the manual way below to active API for Gmail, Contact, and Calendar under the manual configuration process.
Here your automated part is completed. Now let’s check it using the manual way.
Manual Configuration of Google Workspace for migration
Sometimes automate way through an error therefore Microsoft also provides a manual option to migrate from Google Workspace to Office 365.
- Expand the manual configuration option and follow the pre-requisite
Create a project and service account to Generate the Private Key and Save the Client ID
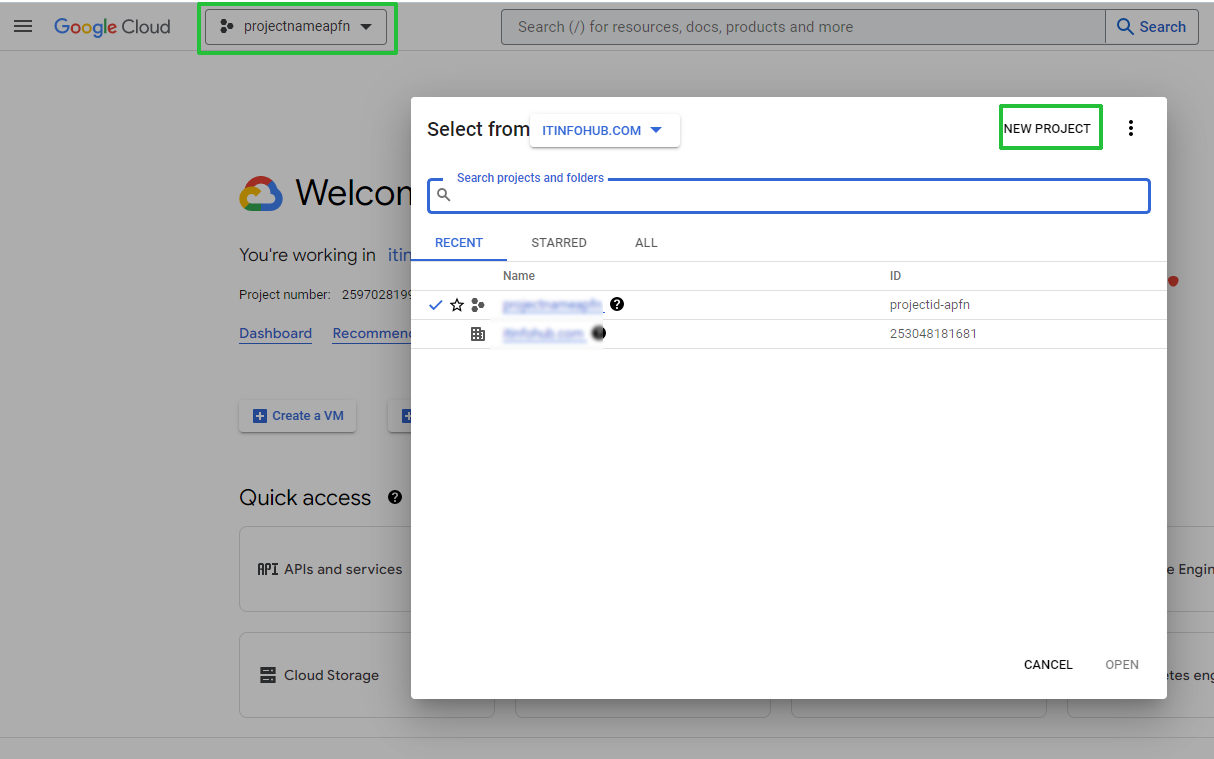
- Open console.cloud.google.com >> Click on the drop-down right after the Google Cloud logo > Select from “Choose Domain” then press New Project in the right corner.
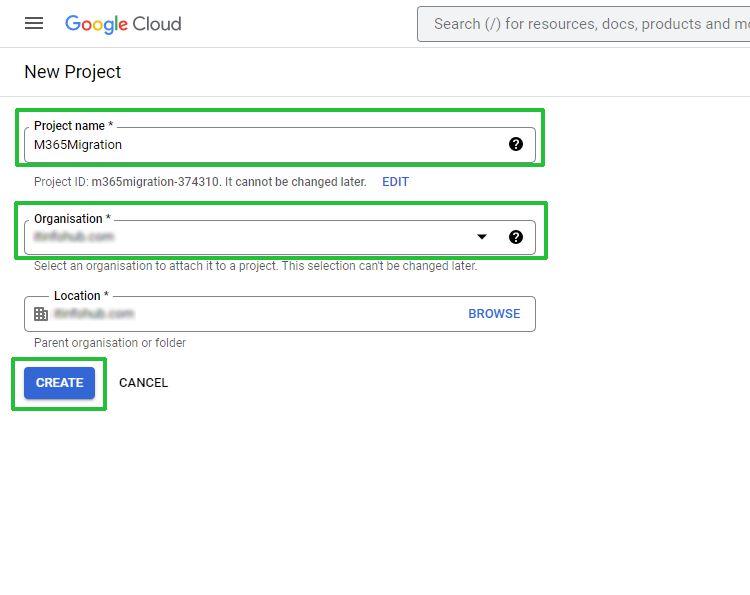
- Give a project name >> Check the organization and location that will contain your domain name then hit on the Create button.
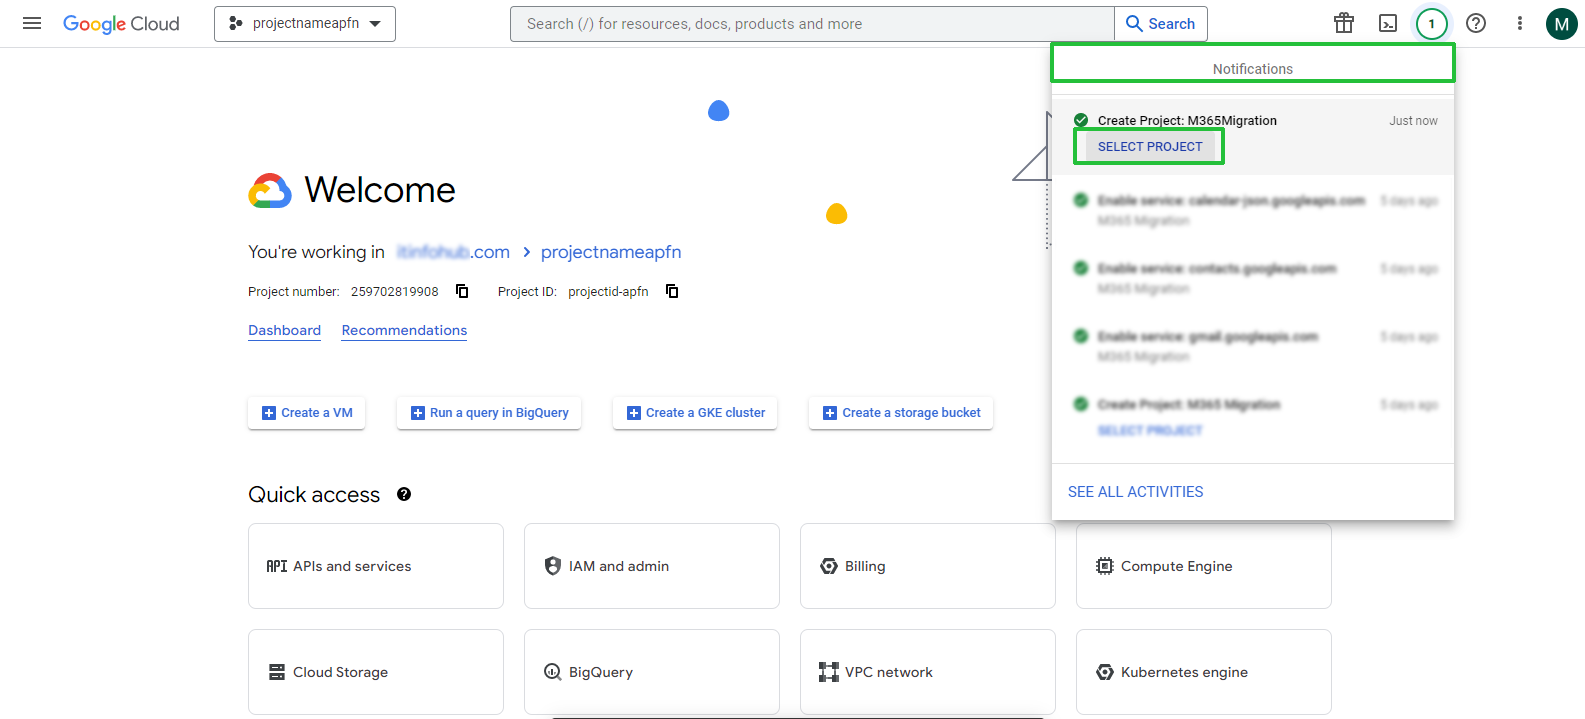
- In the notification area, it creates the project. Click on the select project after creating it.
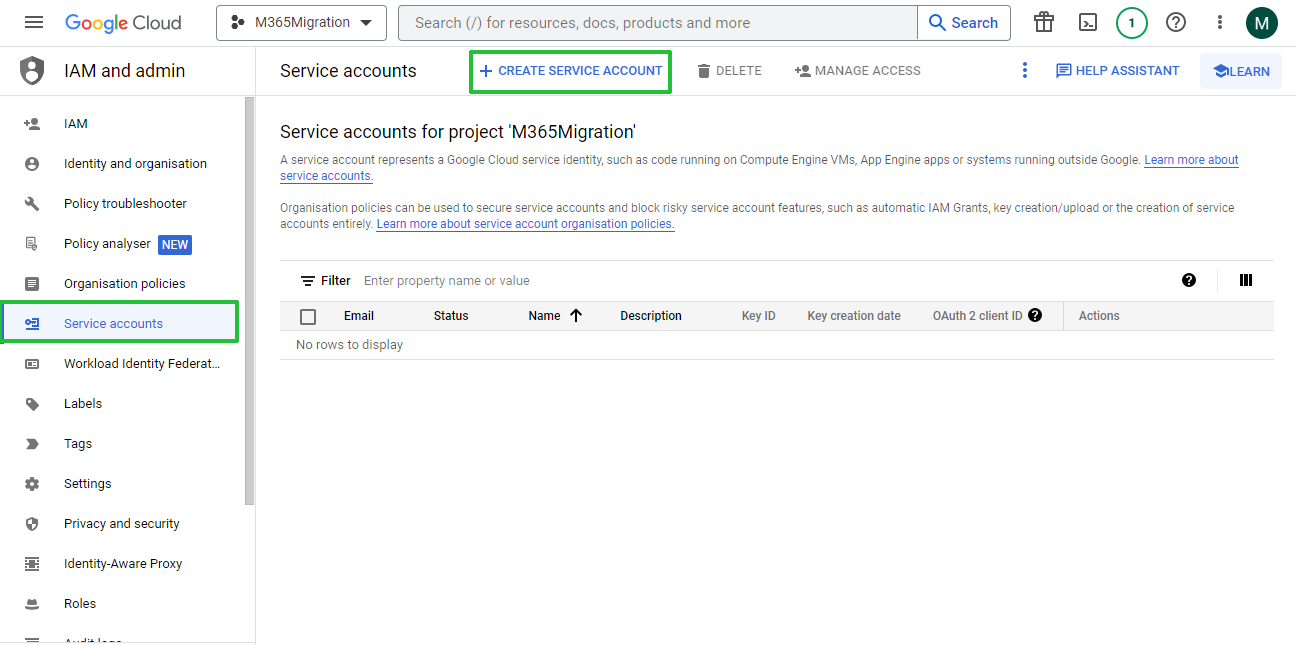
- Visit: https://console.cloud.google.com/iam-admin >> Service Account
- Click on +create service account (ensure that the service account is created under your project).
- Type the service account name and click on the Create and Continue buttons.
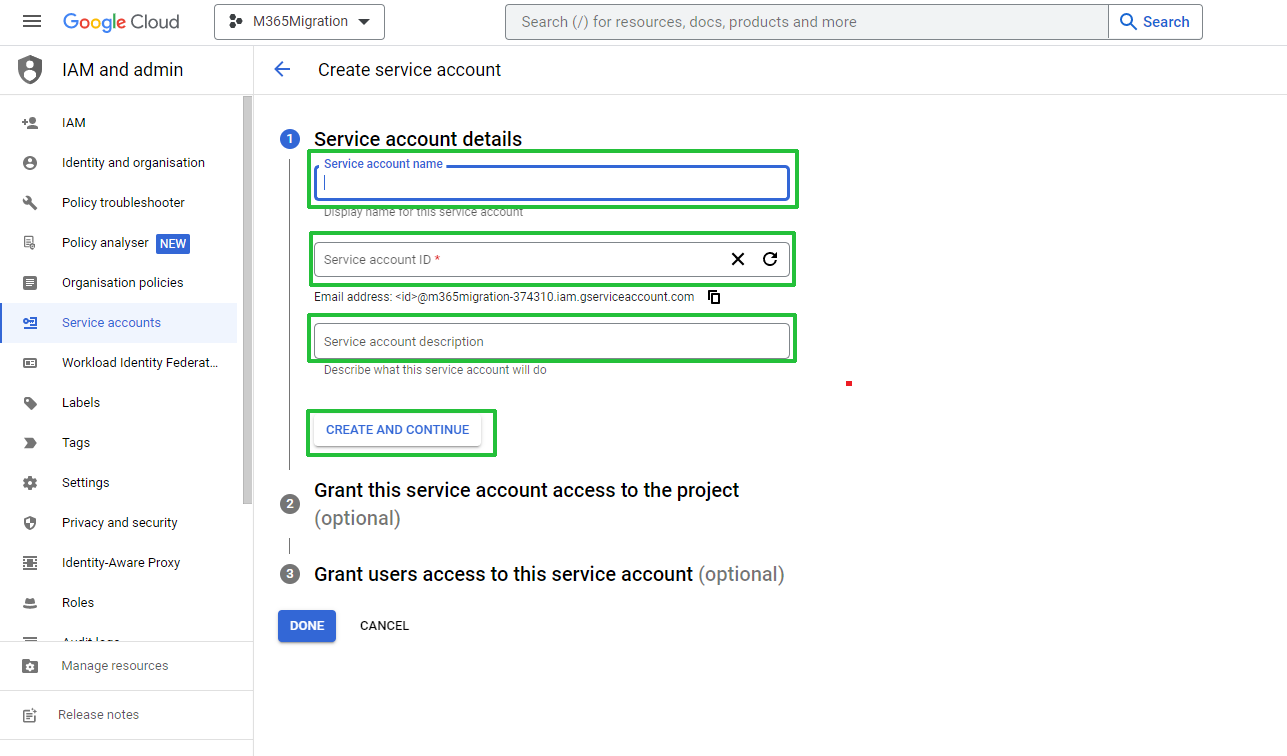
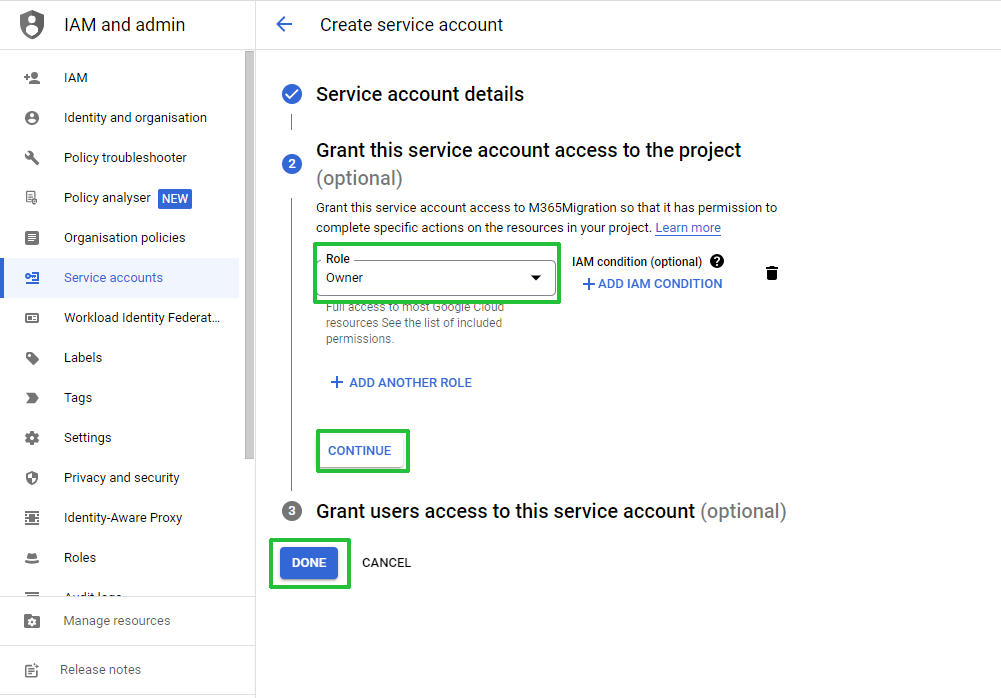
- In the role drop-down, choose Owner then press continue.
- Press done button
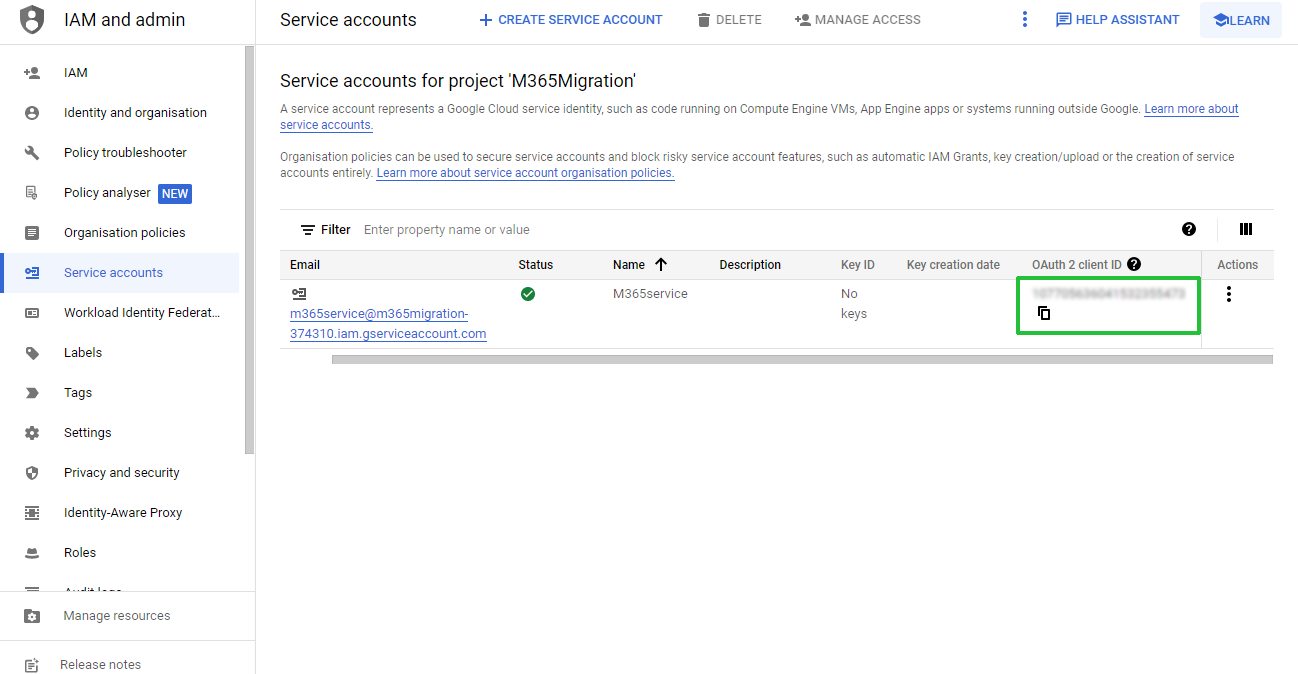
- After successful service account setup, copy the OAuth 2 client ID and save it.
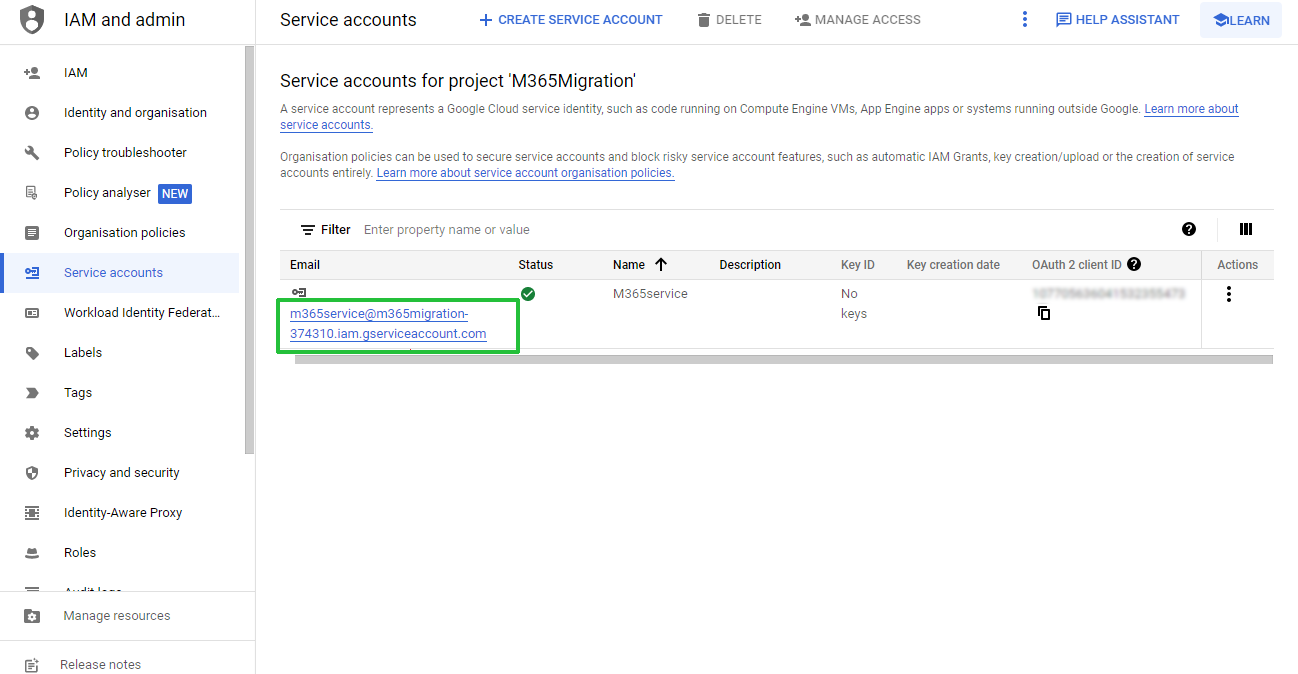
- Click on the service account to generate the Private Key
- Go to Keys tab >> Add Key > Key type: JSON, click Create.
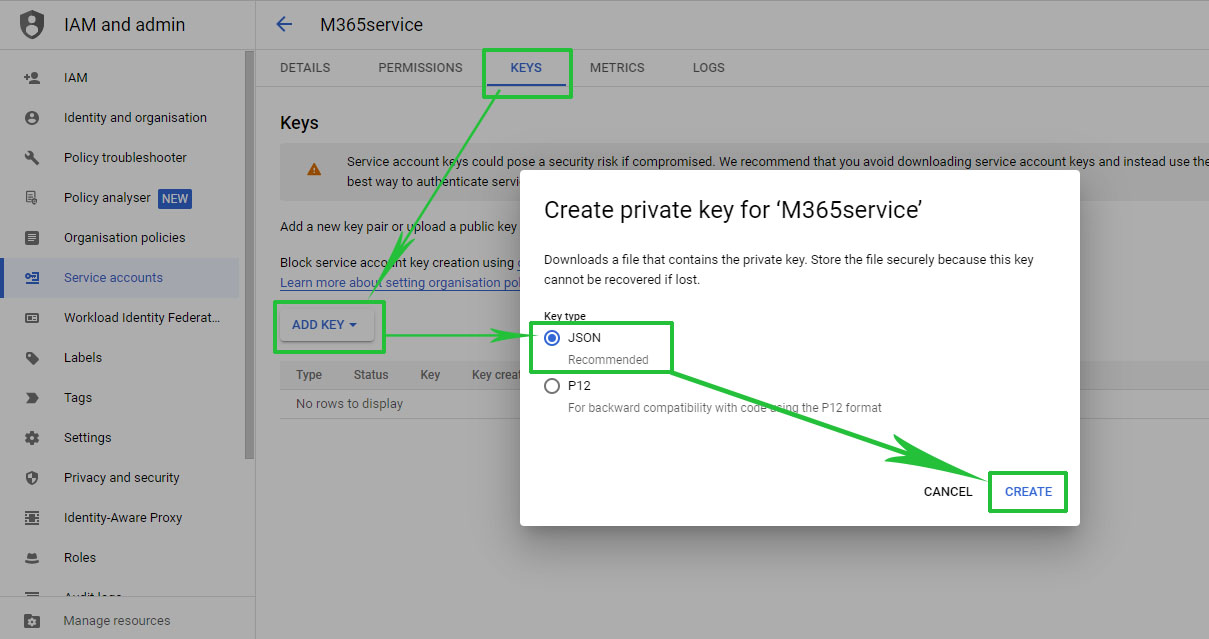
- The key will be generated and saved to your local system.
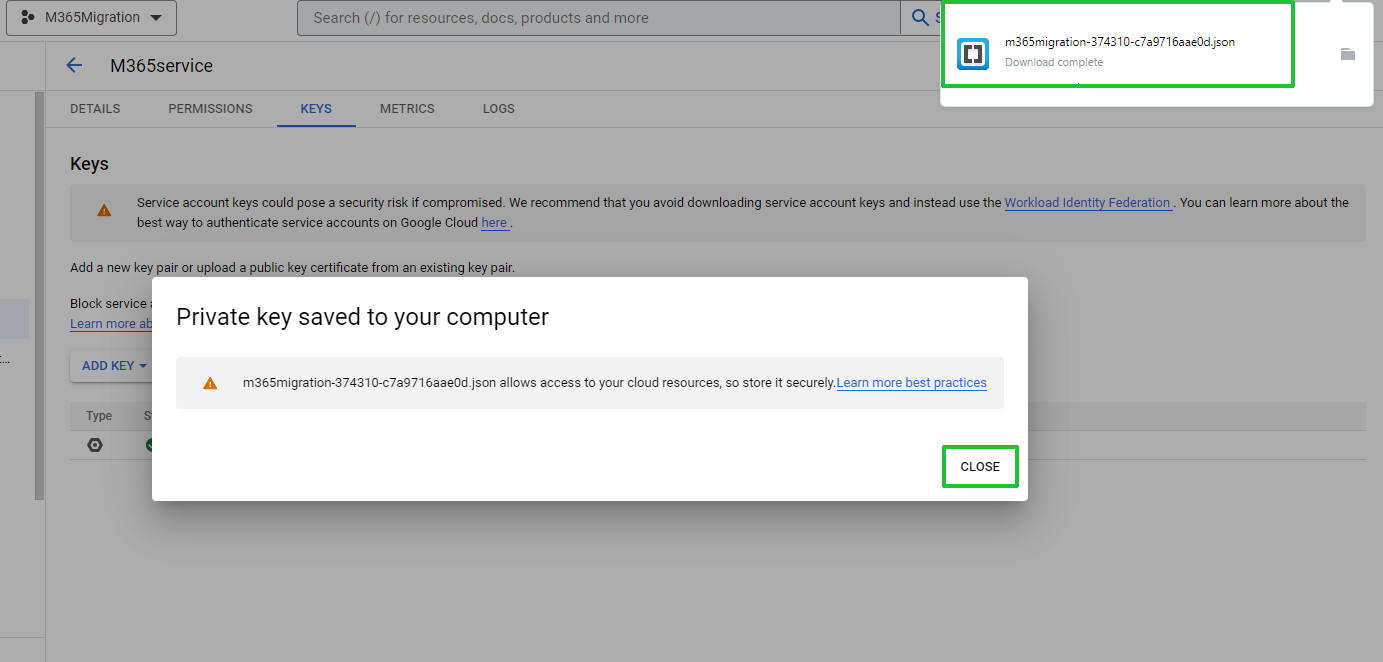
Delegate Domain Wide Access to the Service Account
- Visit https://admin.google.com/ac/owl/domainwidedelegation and click on Add New.
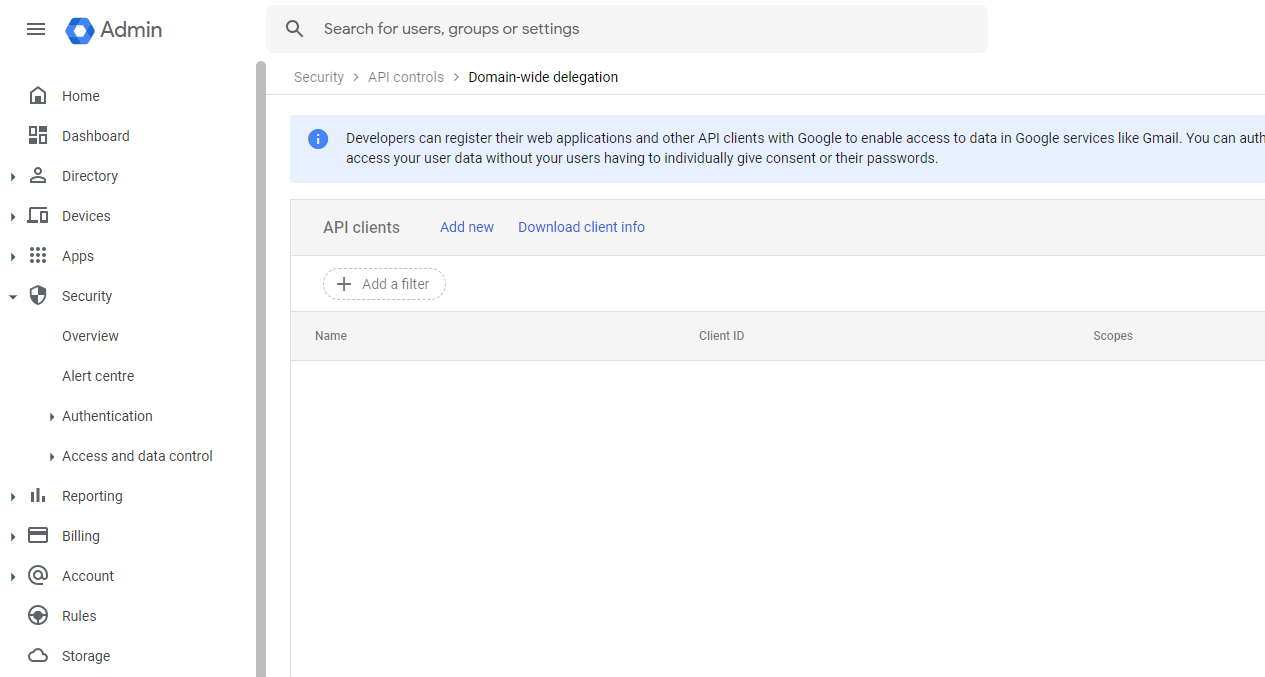
- Paste your Client ID.
- Copy and paste OAuth Scope: (https://mail.google.com/,https://www.google.com/m8/feeds/,https://www.googleapis.com/auth/calendar,https://www.googleapis.com/auth/gmail.settings.sharing)
- Click on the Authorize button to finish the delegation steps.

Enable Mail, Contact, and Contact APIs
- For API permissions, visit: https://console.cloud.google.com/apis/library
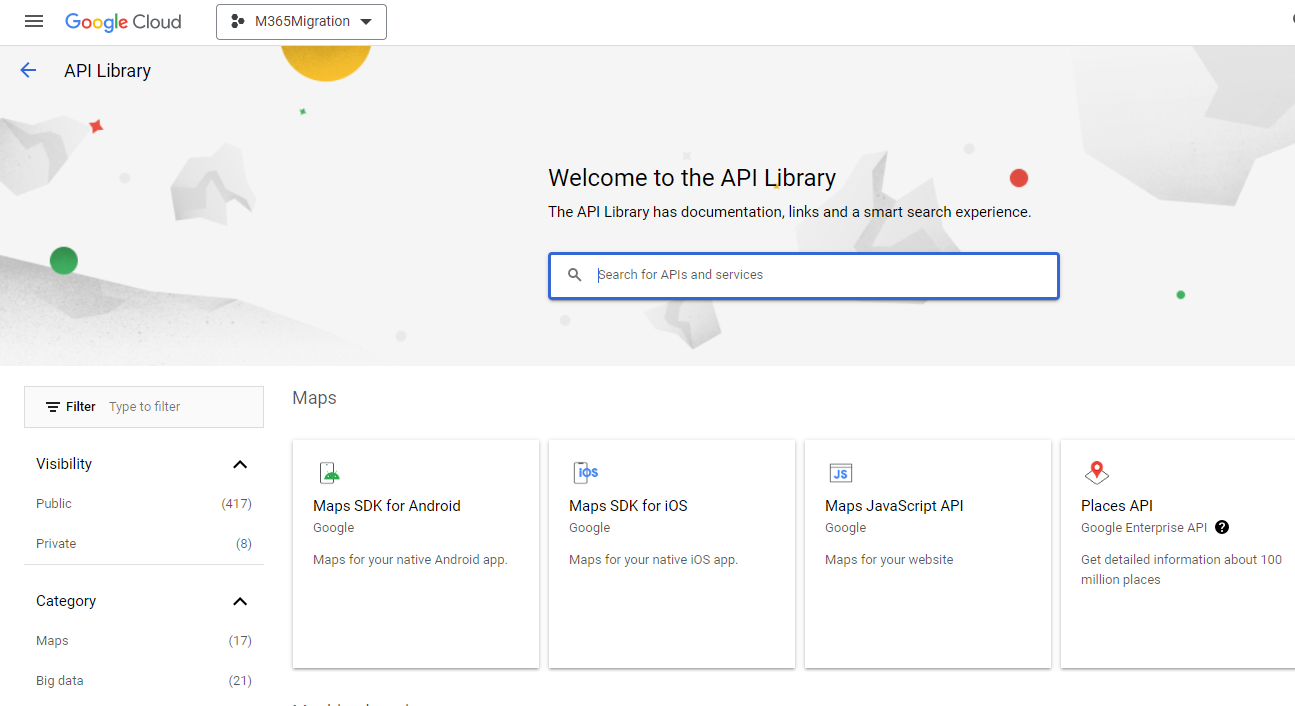
- Search Gmail API and Enable it by clicking on it.
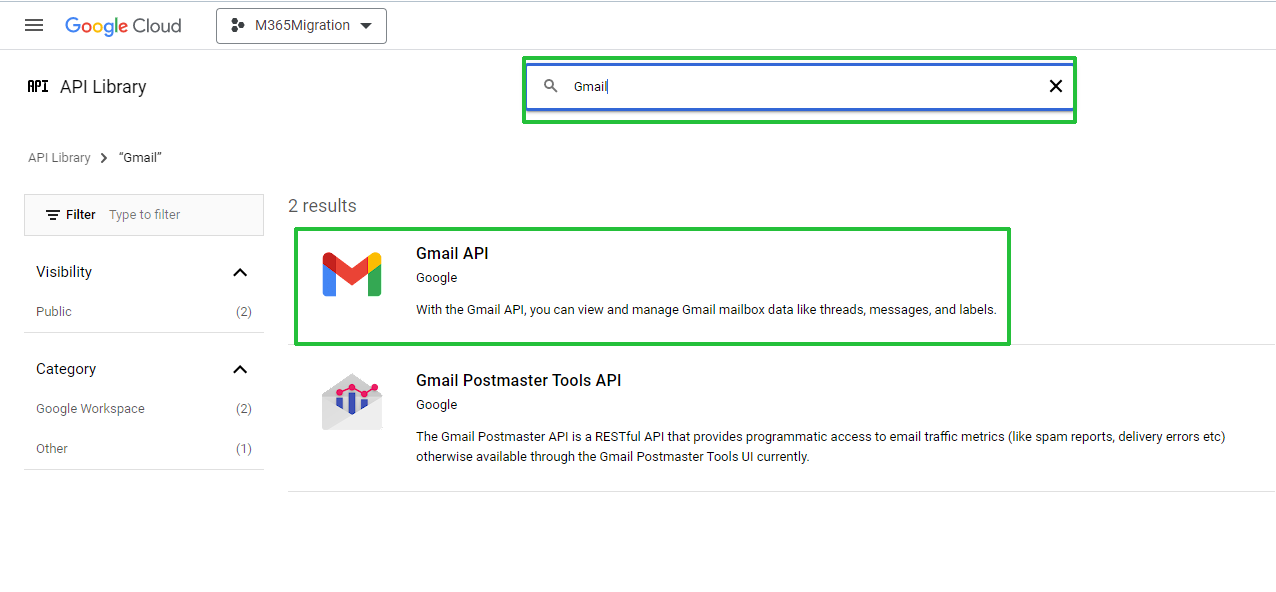
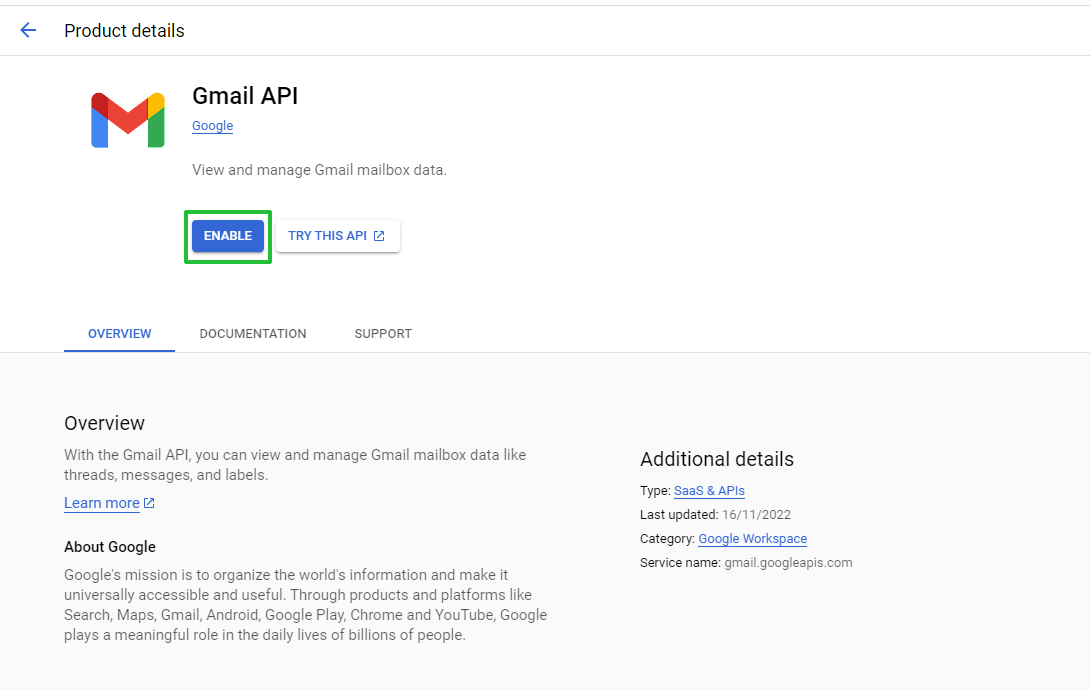
- Similarly, search for contact and calendar to enable the API.
- Now we can go back to our EAC panel to resume the process with any one configuration option.
- Click on Next.
Continue Google Workspace to Office 365 Migration with Automate or Manual
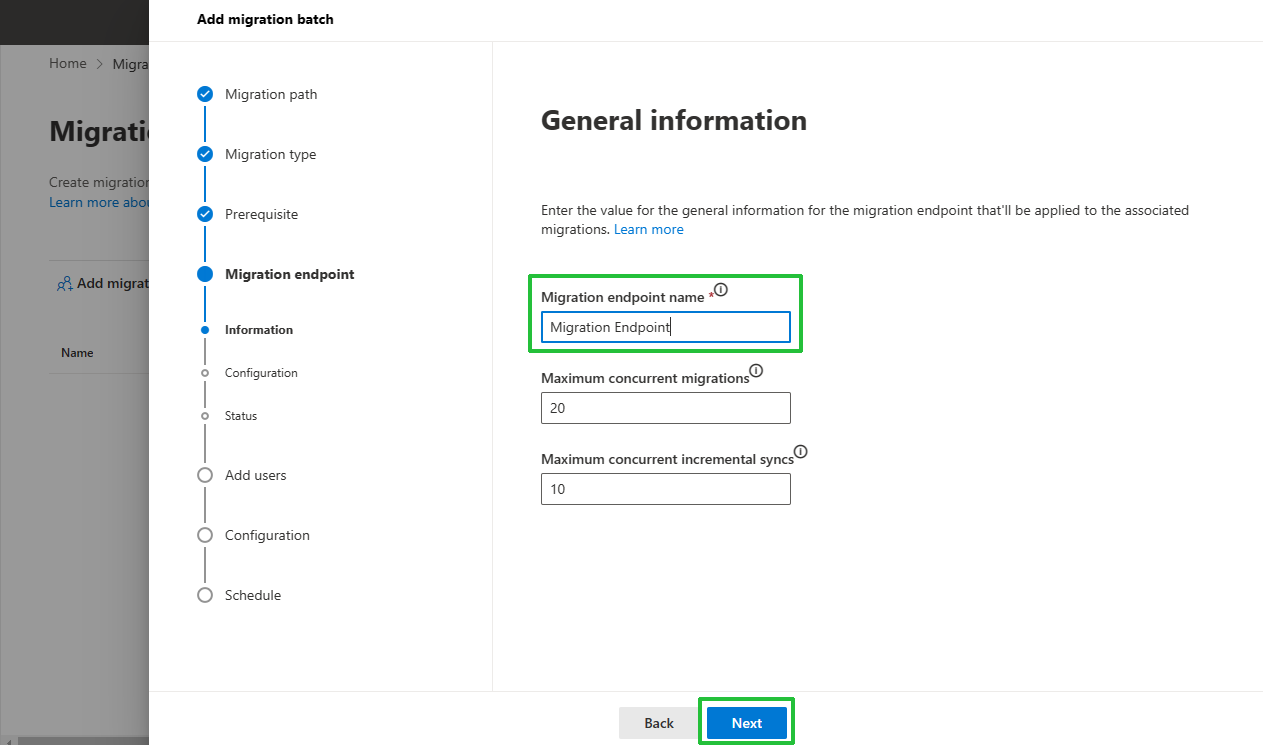
Step 6: Set a migration endpoint > Choose “Create a new migration endpoint” then Next.
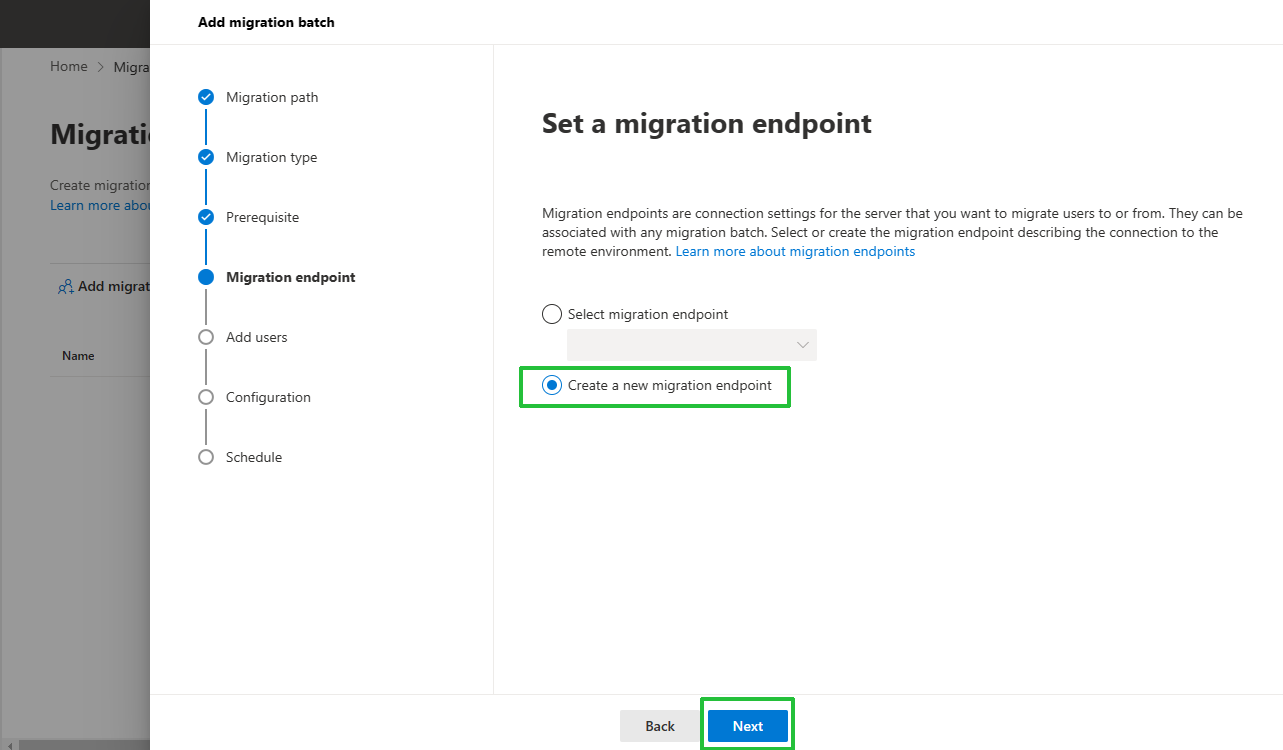
- Type migration endpoint name then Next.
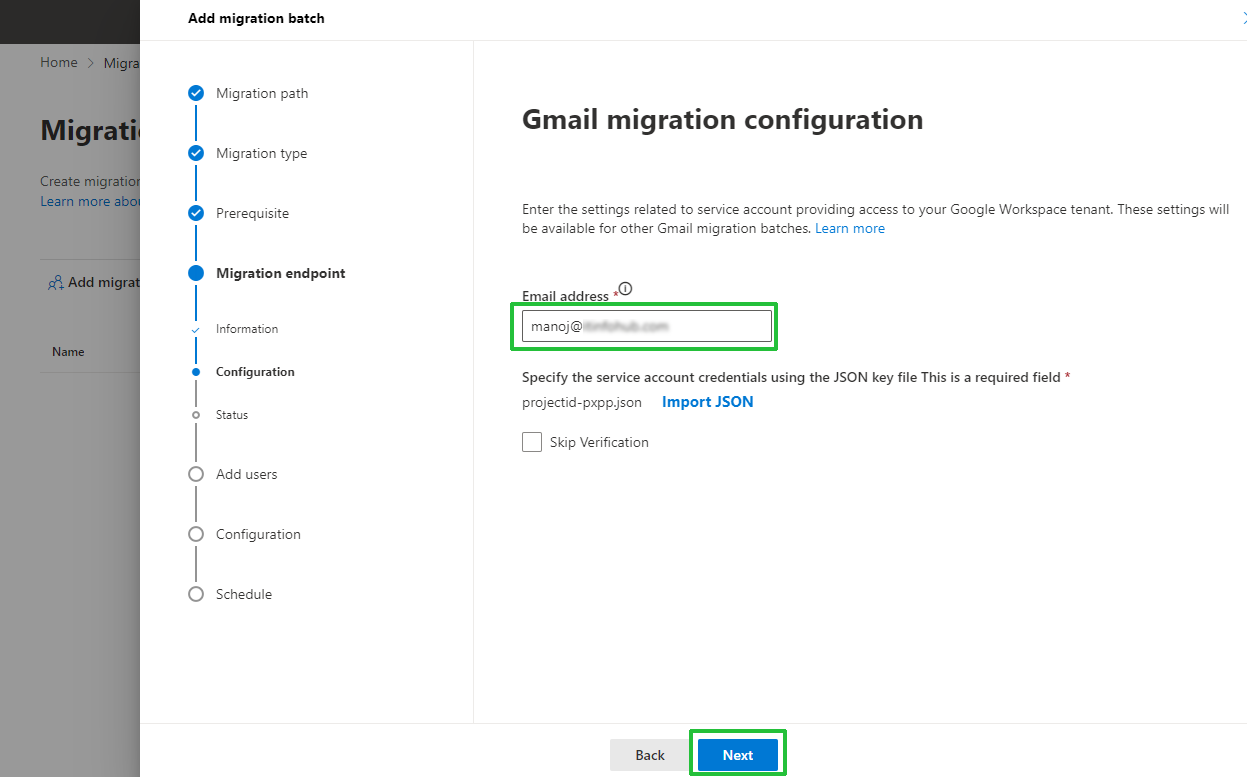
- Provide the Gmail admin account address in the Email address field then Next.
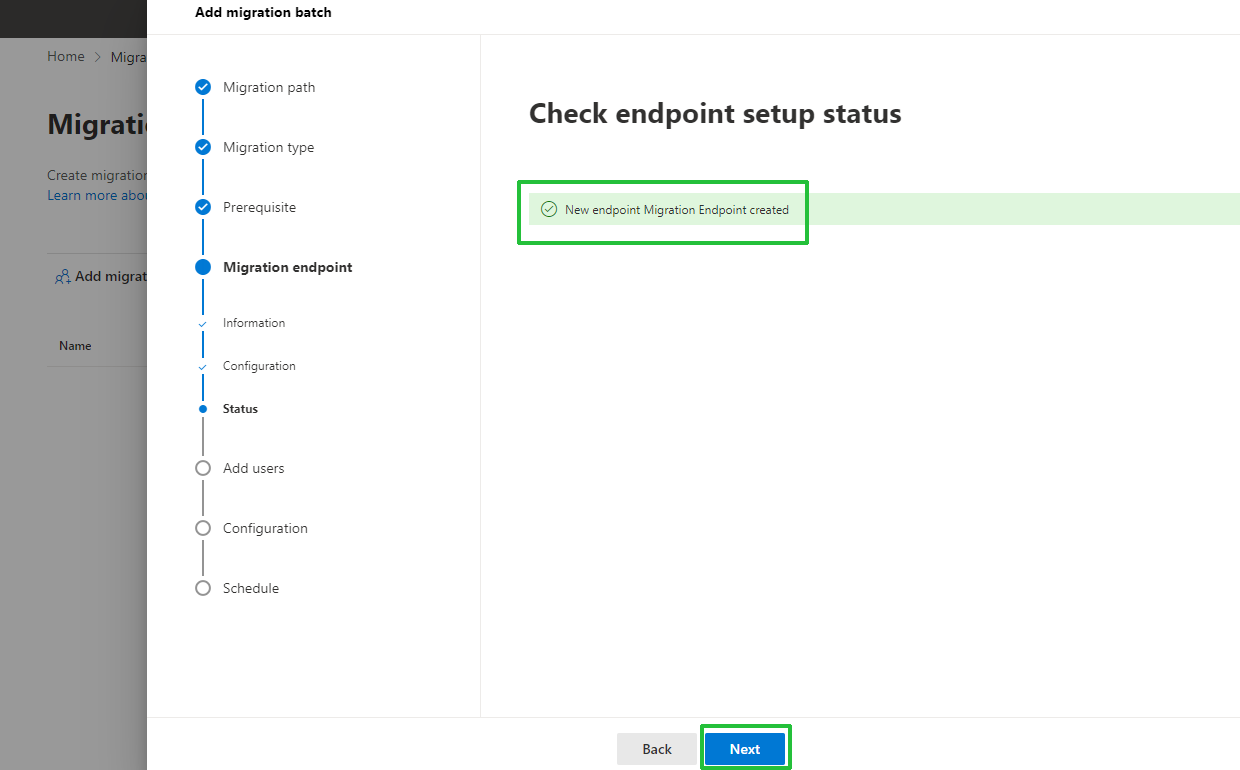
- In a few seconds, a new migrations endpoint will be created, click on Next.
Step 7: Now we have to create and add a CSV file to Map the user from source to target.
- You can create a CSV file via the below image: First EmailAddress column = Target Email ID, Second UserName column = Source Email ID
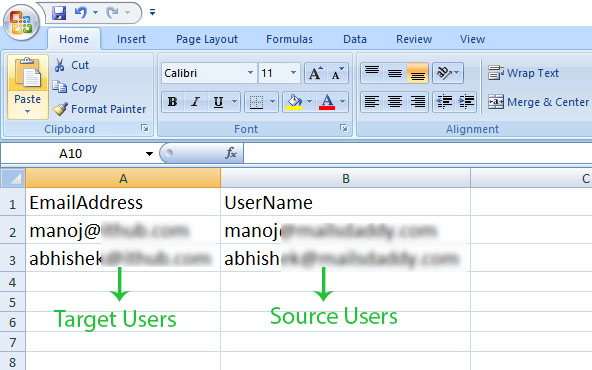
Note: if your source and target domain names are the same then you don’t need to add a second column UserName.
- After importing the CSV file, click on Next.
Step 8: In the move configuration screen, select the target domain name. Ensure you want to migrate Email, Contact, Calendar, and Rules to Office 365 from G suite.
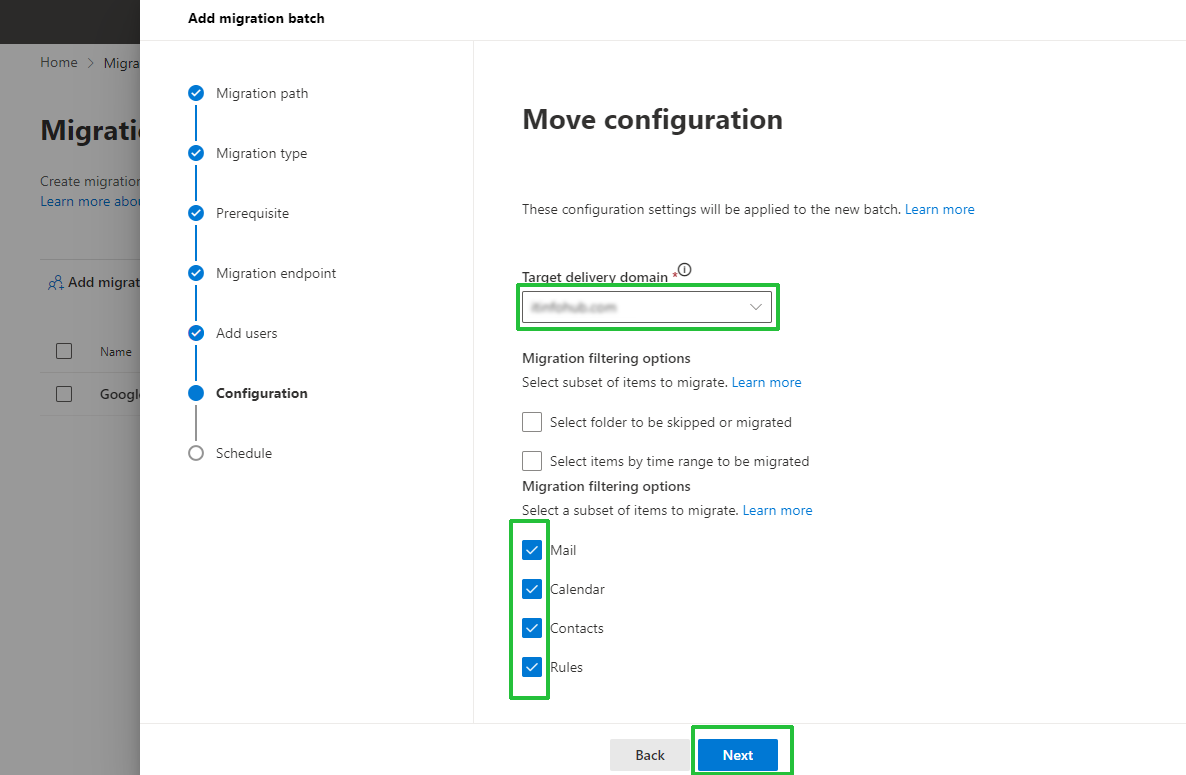
- Click on Next
Step 9: In the last screen, we have to choose one or more users who will get the migration report.
- Select Automatic Start the batch and automatically complete the migration batch then set Timezone and Next.
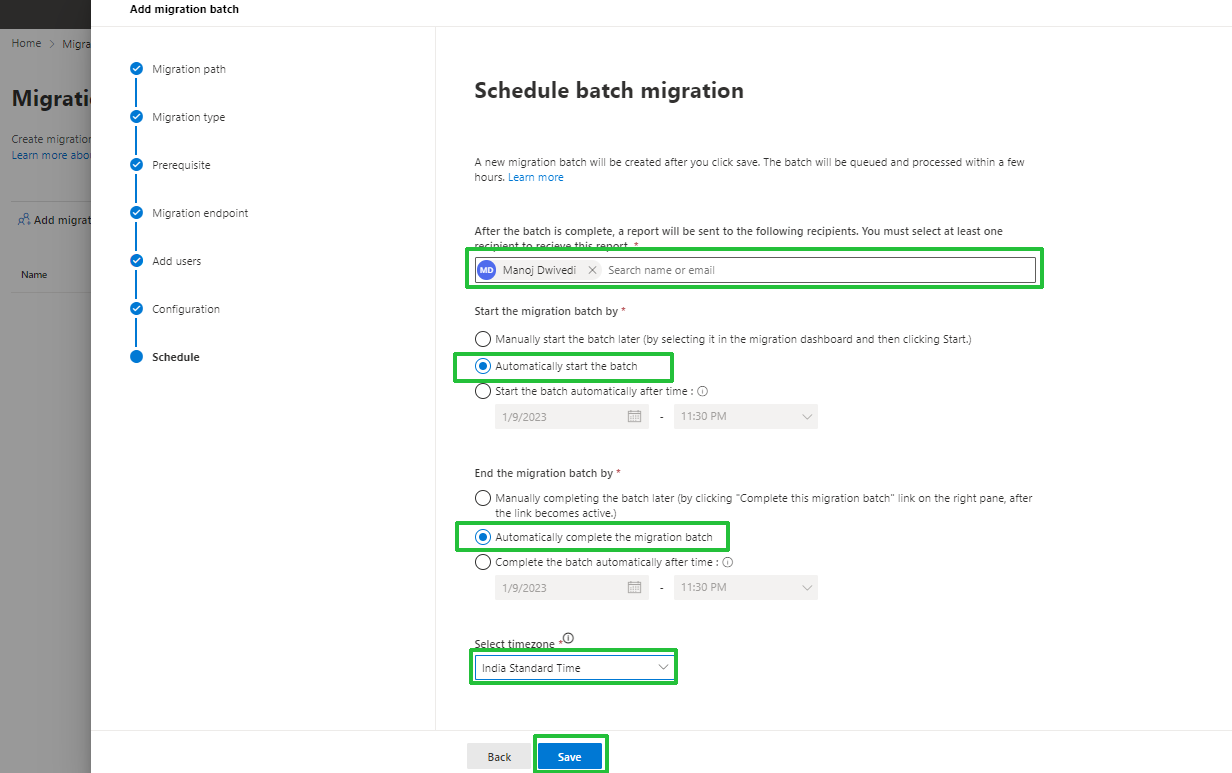
Note: you can also select the manual option if required
- In a few minutes, batch creation is successfully initiated. Click on the Done button.
- The syncing process starts after the migration batch. You can check the status by clicking on it. You can also refresh the page to check the status.
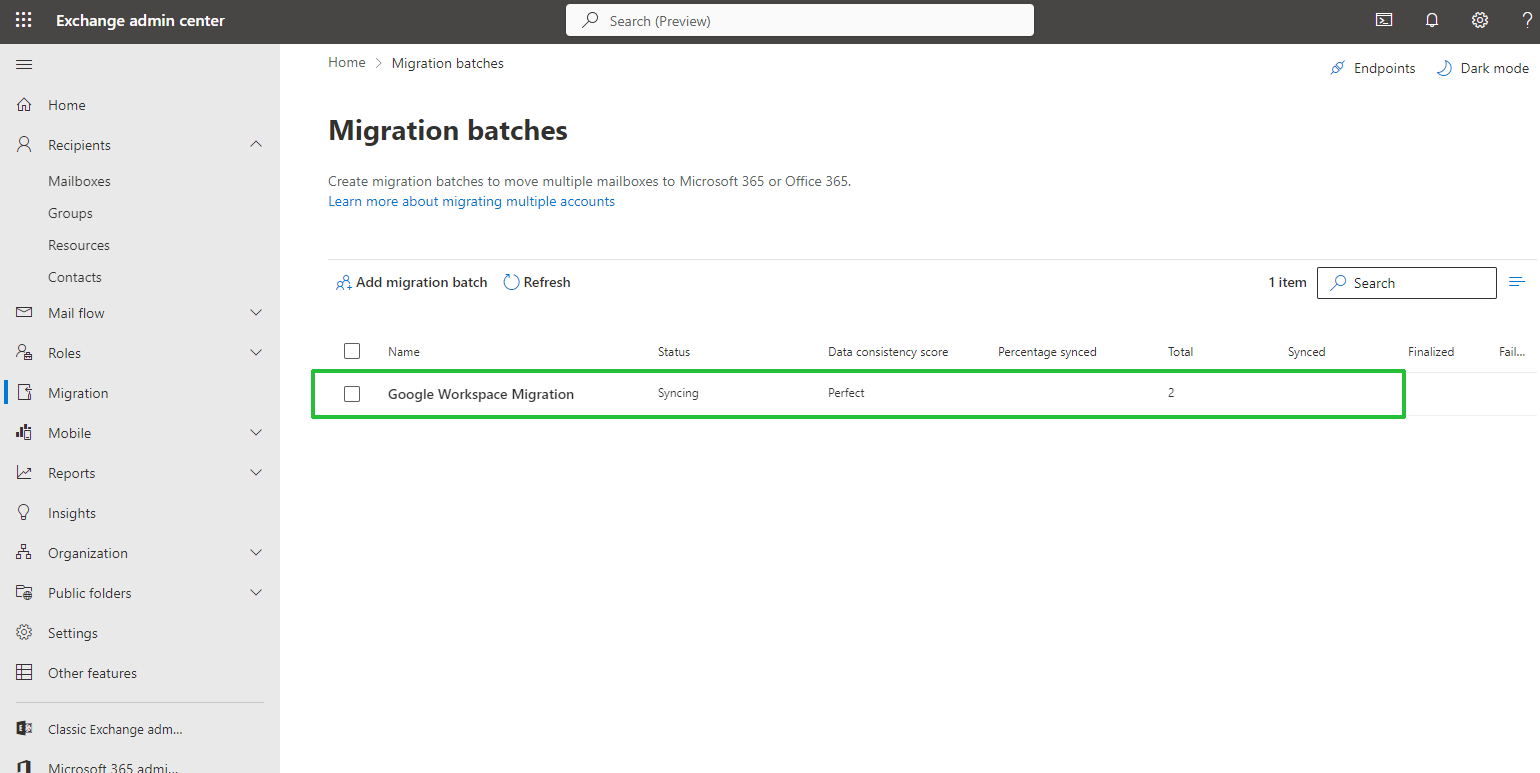
Note: it will take time depending on your mailbox size.
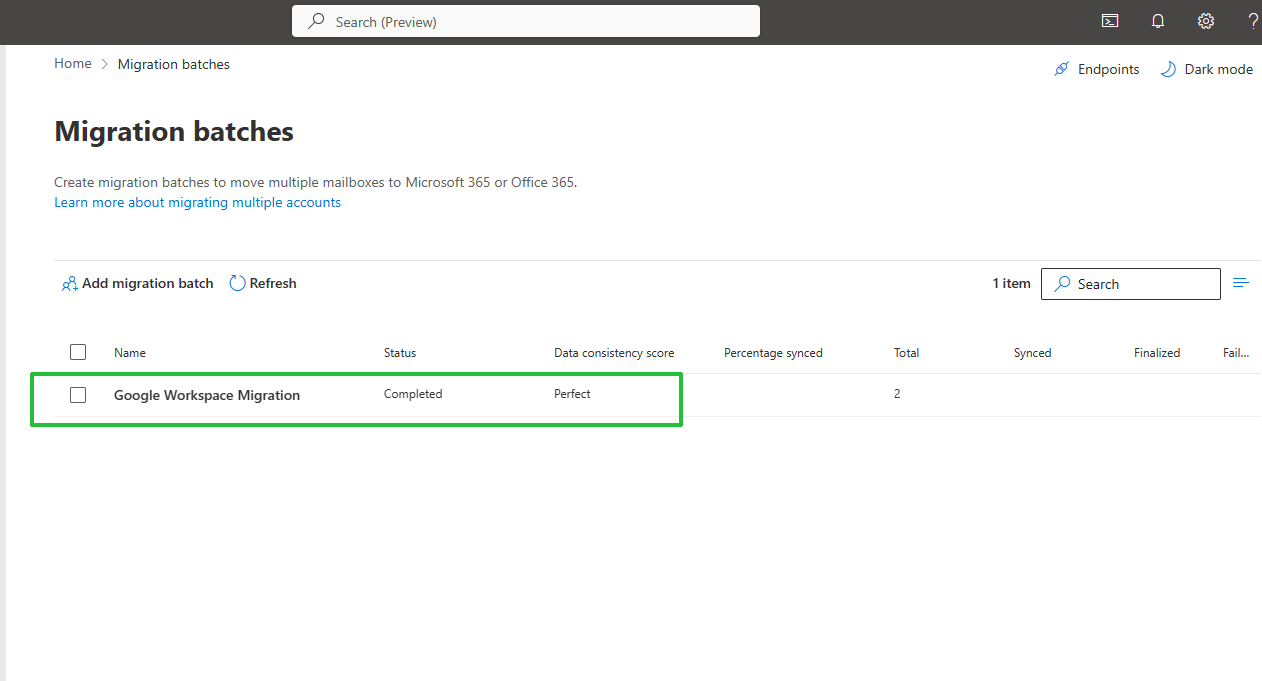
Now you are happy to finish the Google Workspace to Microsoft 365 migration steps. After that, we need to add the MX record so that mail routing will be changed to Office 365 from Google Workspace.
Manage DNS to Add MX records for mail routing
- Navigate to O365 admin center >> Setting >> Domains
- Select the domain in which you want to add the MX record.
- Click on Manage DNS
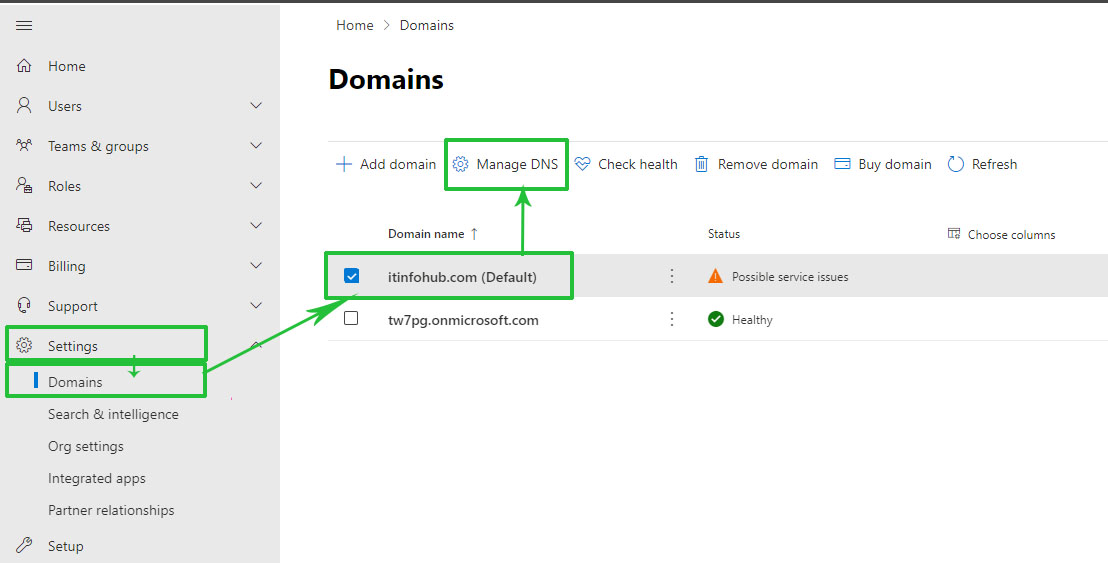
- Choose one option like I choose to Add your own DNS records then continue.

- Now you will the values that you have added to your domain. After adding all the values, click on continue.
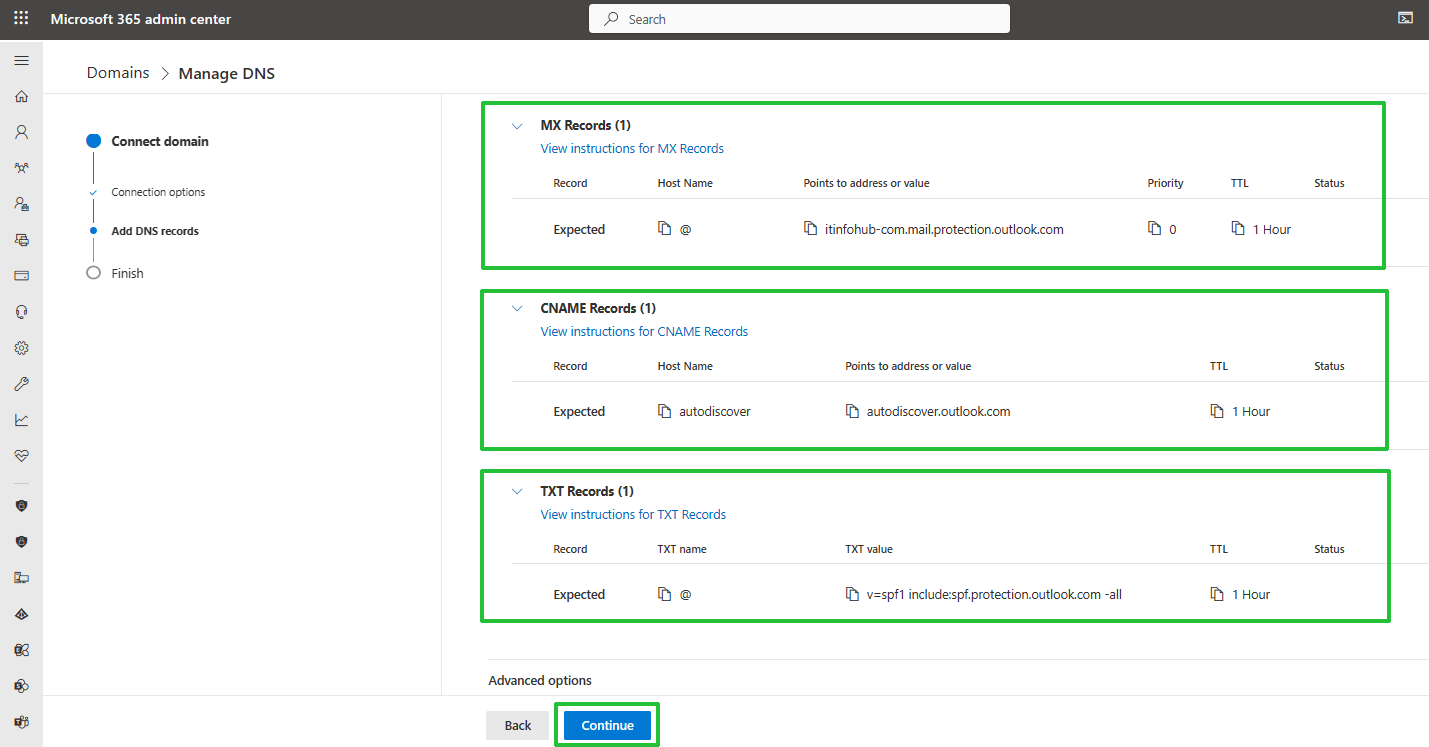
- It will verify the details and your migration is completed here.
End Line
This post contains a manual and automated way to migrate from Google Workspace to Office 365. Also, I have shared the overview of G Suite and M365 applications. Both the platforms are best in their niche and the user has full right to choose the best one among them. You can also contact our support team if you need further assistance OR Schedule service for your Google Workspace to Office 365 migration with us now.
Read more: How to download all Outlook Attachments?
Read more: Eseutil to Repair Exchange Database

Pingback: How Users Can Process Office 365 Tenant to Tenant Migration?
Pingback: What is Windows 365 and How to use it?
Pingback: Step-by-Step Guide to Using Microsoft Copilot in Outlook & Teams