Team collaboration is the most essential and beneficial part of an organization which is fueled by communication. This widespread communication is served by a variety of effective email clients, the most popular being Office 365.
It provides the user latest applications and advanced features that do not require spending separately. One of its features is Microsoft 365 Group. If you are unaware of it or want to create and access it in Outlook then this post is for you.
It is a sync of all steps to add, create or open Office 365 Group in Outlook.
What are Groups in Microsoft 365?
Microsoft 365 Groups works with Microsoft 365 tools used in an organization. So that group members can collaborate with their peers while scheduling meetings, creating spreadsheets, writing documents, and sending emails.
In other words, Group allows designating a group of people who can cooperate and use resources together, such as file transactions, calendars, Outlook inbox, spreadsheets, projects, etc.
The best feature here is that you don’t need to give permissions to resources manually. It automatically gets assigned with the addition of members.
There are a variety of platforms built into M365, so here’s what you need to be aware of before you begin.
For:
- Emails and Calendar – Create Group in Outlook
- Chat or App – Create a Microsoft Team
- Discussion Forum – Create a Group in Yammer
How to Create Office 365 Group in Outlook 2019?
Before opening Office 365 group in Outlook, you need to ensure that you have configured Microsoft 365 account in Outlook. Otherwise, Group option is not visible in Outlook.
Note – You must have Microsoft’s Business Premium, E3 or E5 plan for the Group service.
Note – To use Microsoft 365 Groups in Outlook, Cached Exchange Mode must be enabled in Outlook.
Follow the below steps to create and open Group in Outlook
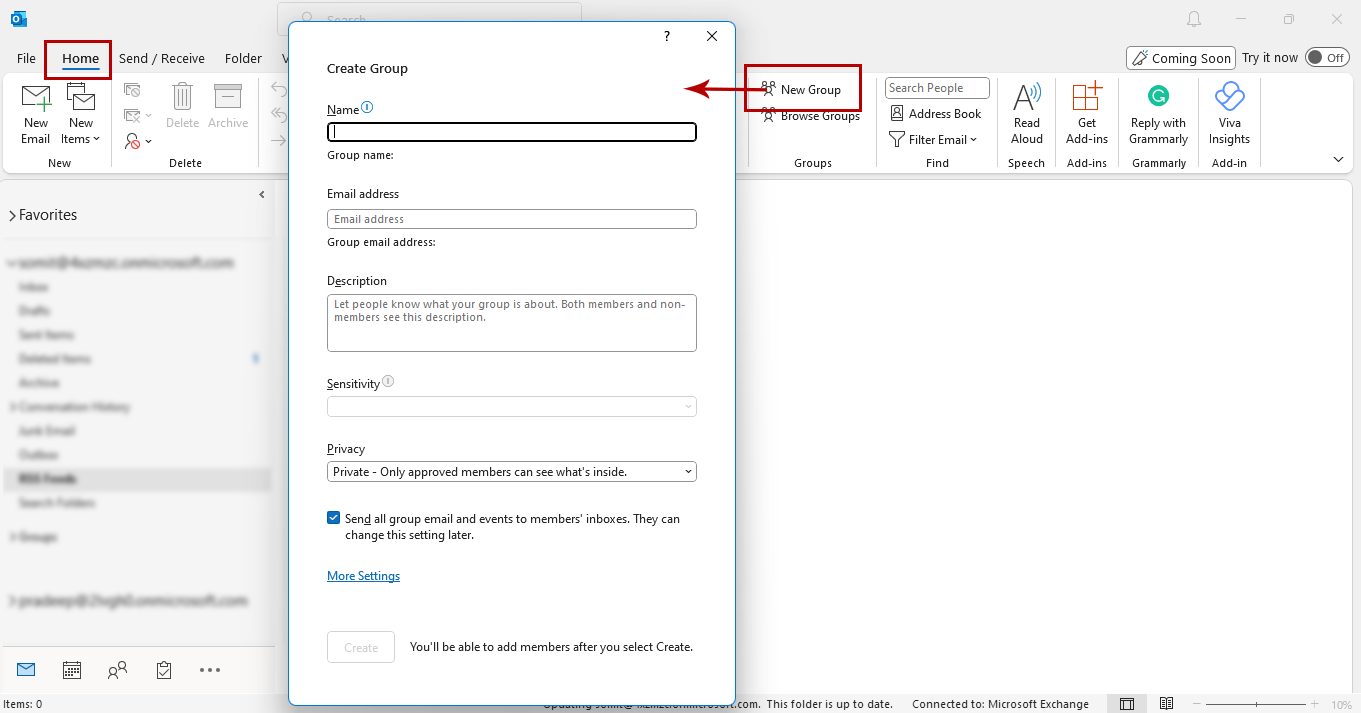
- Launch Microsoft Outlook in Windows >> Go to the Home tab
- Go to the New Group option in your ribbon area
- Fill in the Group detail: like Name, Email Address, Description, Classification, Privacy, etc. (Choose the group name wisely as it cannot be changed further.)

- A check box is an optional choice that can be changed after that.
- Now press on Create
Add a new Member to Outlook Group
If you forget to add someone to the group then you can follow the below steps.
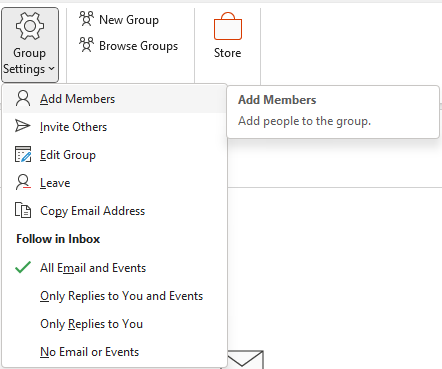
- Go to the group setting
- Go to Add members in the drop-down, and click on Add Members.
- Type the member name and then hit on the OK button.

Join Office 365 Group in Outlook
Follow the below steps to add to the group.
- Outlook >> Home tab
- Go to Browse Group option >> Enter Group name
- Find and click on the Join button
Note: If the group is private, the group admin gets a notification to accept or decline the request.
Leave Microsoft 365 Group in Outlook
If you leave the group, you will not receive any conversations that are held in the group. For this, you have to join it again. However, you will receive replies where your name will be displayed, such as posts and messages.
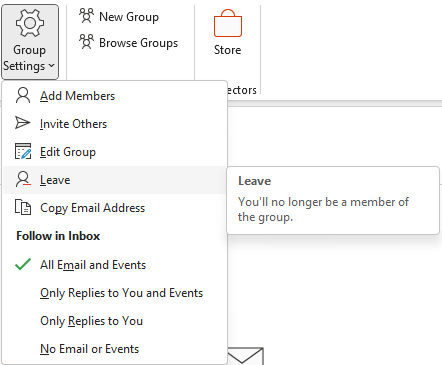
- Outlook >> Select your Gropu
- Group Setting >> Leave option
- Click on the Name of the group then press the down arrow and click on Leave group.

That’s it.
Closing Statement
I hope this post covers all the detail related to creating Office 365 group in Outlook. Also, you will know to add more members, Join and leave the group. By following the above simple steps anyone can create a Group in Microsoft Outlook without any technical hassle.
Read more: Import Zoho Mail to Outlook PST
Read more: Move Gmail Contact to Outlook

