
In organizations, users rely on various platforms to update and notify others about their daily tasks and assignments. One such popular platform is Office 365, which enables teams to collaborate efficiently through cloud-based resources. To access an Office 365 workplace, users must have valid credentials and mailbox access.
Adding a user and assigning a license in the Microsoft 365 admin center simplifies the process, allowing users to sign in and access their Microsoft 365 mailboxes easily.
To follow the methods below, you should have admin access or a global license of O365.
Watch Now
How to Add a User in Microsoft 365 Admin Centre?
When you log in to Office 365 with an admin credential, you can add single or multiple users to your Office 365 account. Here’s how to add a single user:
Add a Single User
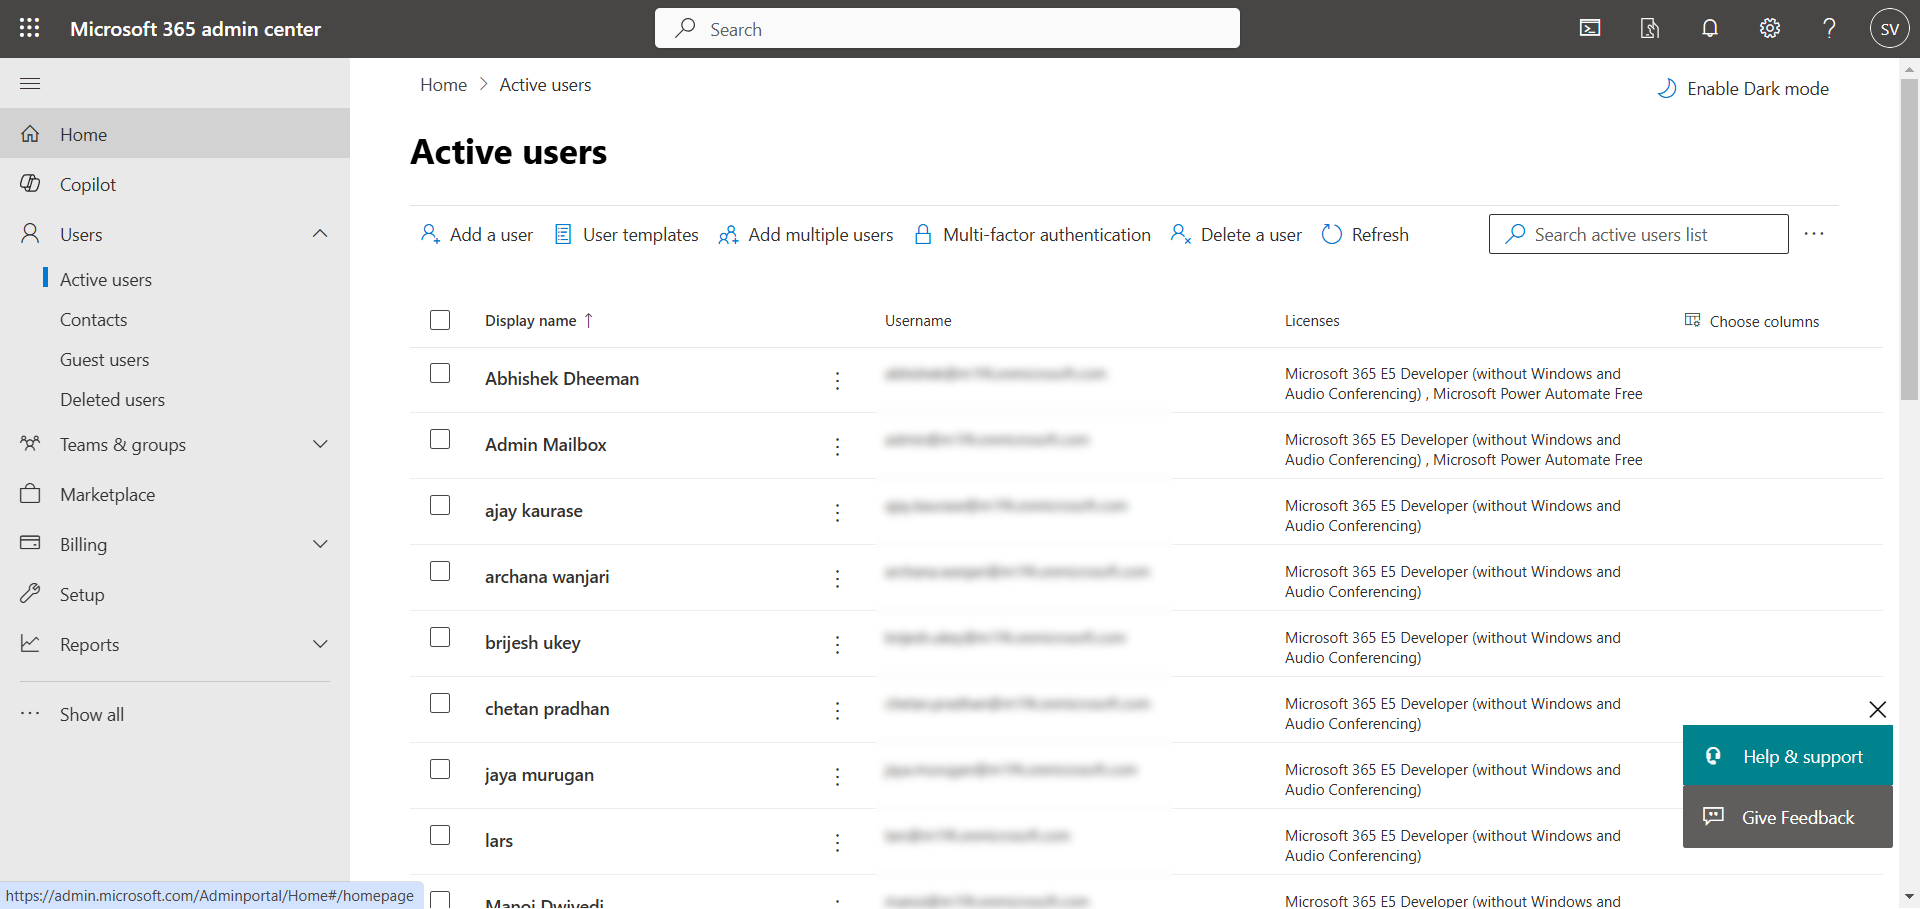
- Navigate to the Active Users option under the Users drop-down menu.
- Click the Add a User button.
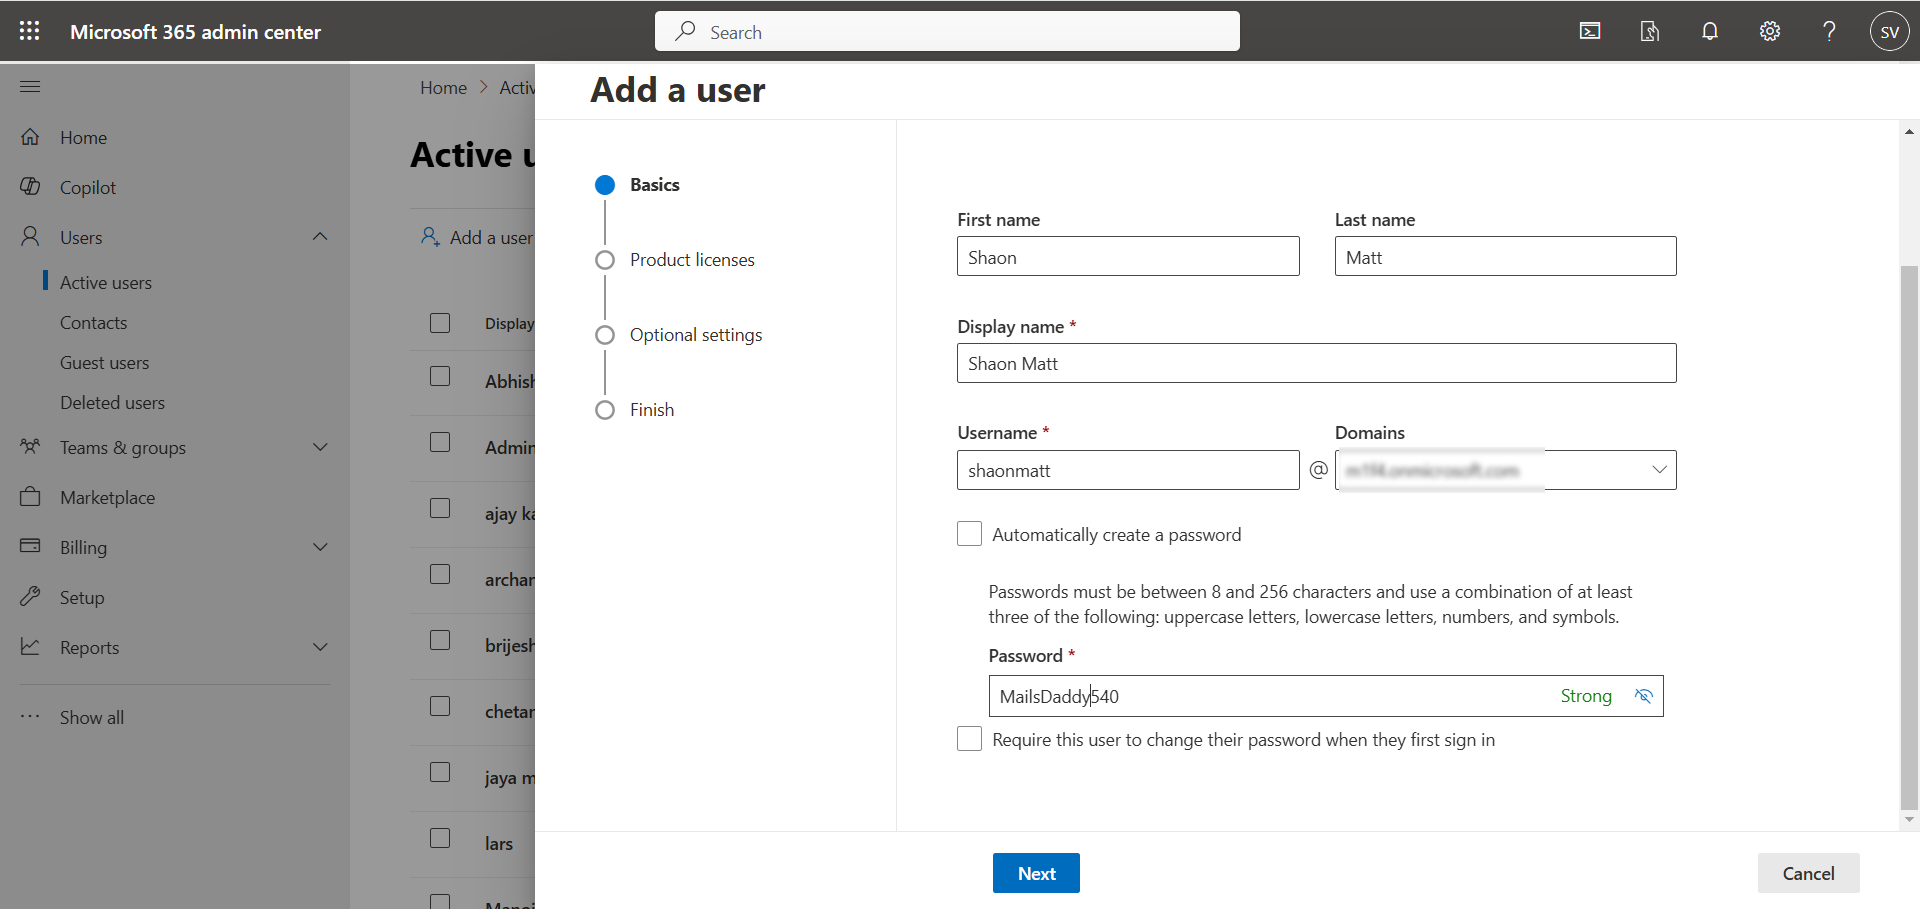
- Enter the required details, including the first name, last name, display name, and username.
- Select the domain for the user account and specify the sign-in details.
- You can either generate a password automatically or set a new password for the user. If you choose automatic generation, decide whether to send the password via email to the user after account creation.
- Click Next to proceed.
- Choose the user’s location and assign a license. If you are out of licenses, you can purchase additional ones.
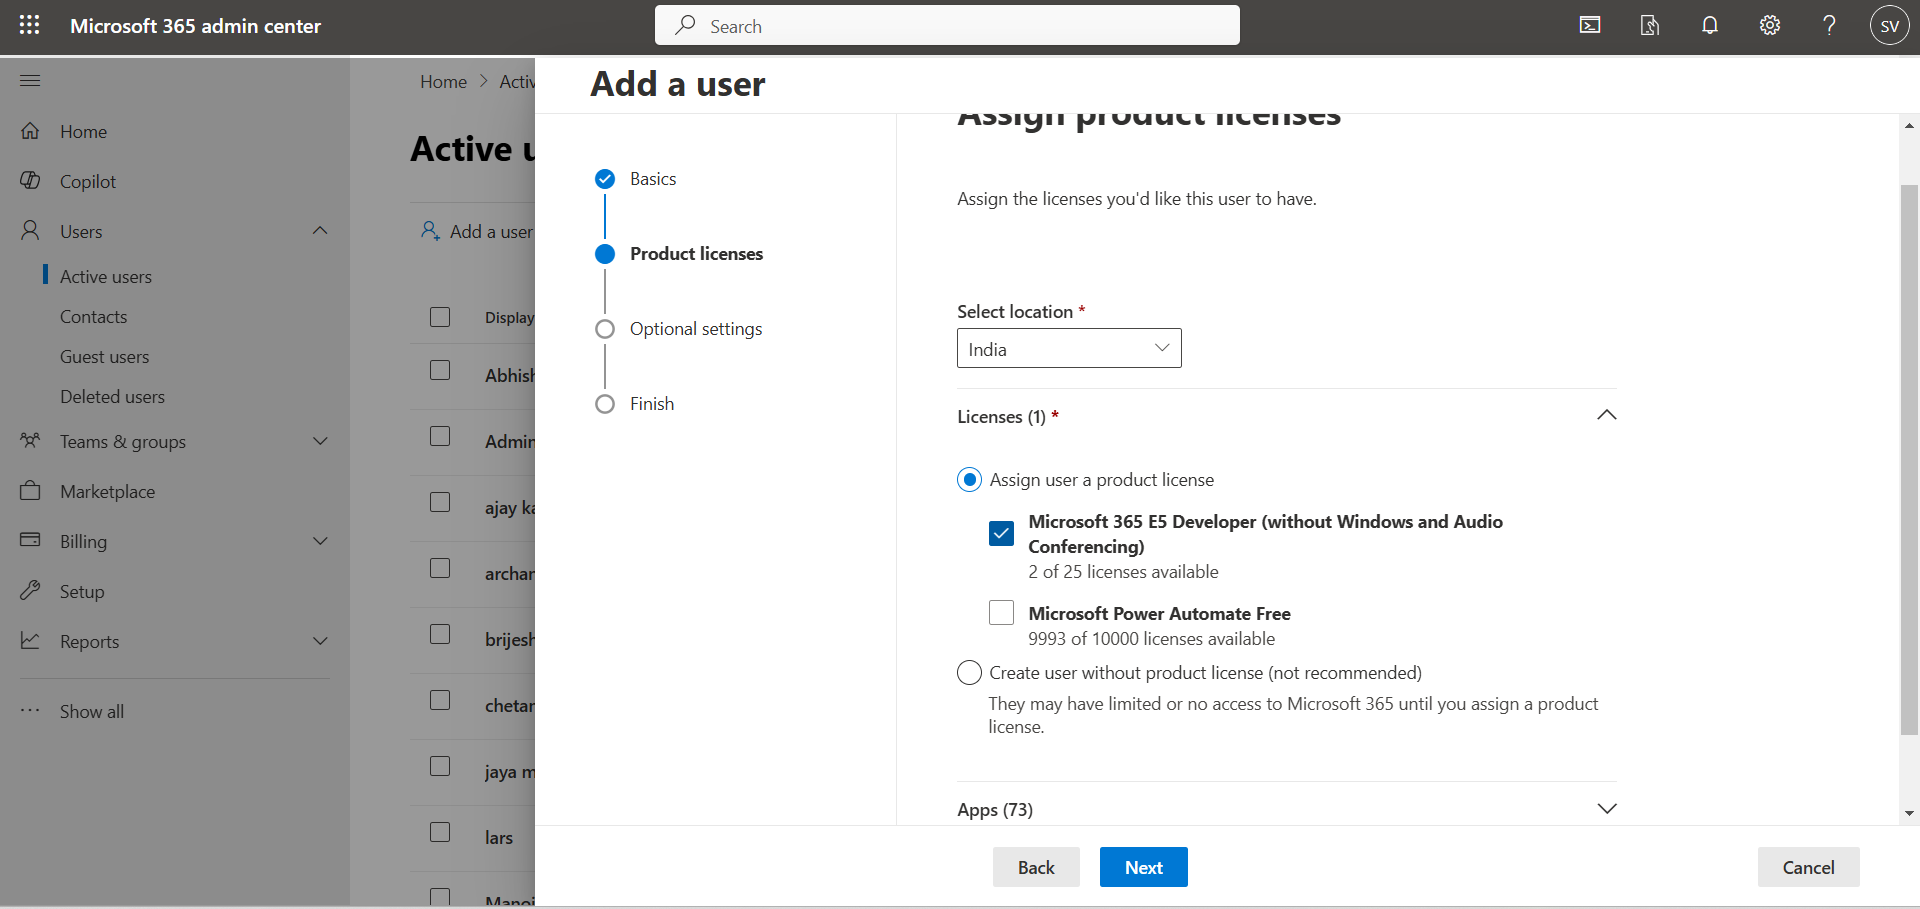
- Setting roles and profile information is optional and can be configured later. Click Next to continue.
- Review the entered details to ensure everything is accurate, then click Finish Editing.
- Finally, click the Close button.
This is how you can add a single user in the Microsoft Admin Center. Now, let’s move on to adding multiple users.
Add Multiple user in Office 365 with License
Adding 50, 100, or more users to Office 365 individually can be a time-consuming task for organizations. To simplify this process, Microsoft 365 (M365) offers the option to add multiple users at once using a CSV file. Here’s how you can do it:
Add Multiple Users in Office 365
- Navigate to the Active Users section in the M365 Admin Center.
- Click on the Add Multiple Users option.
- Check the box to download the example CSV file and fill in the required details, such as first name, last name, username, and other relevant information.
- Note: The maximum number of users you can add in a single CSV file is 249.
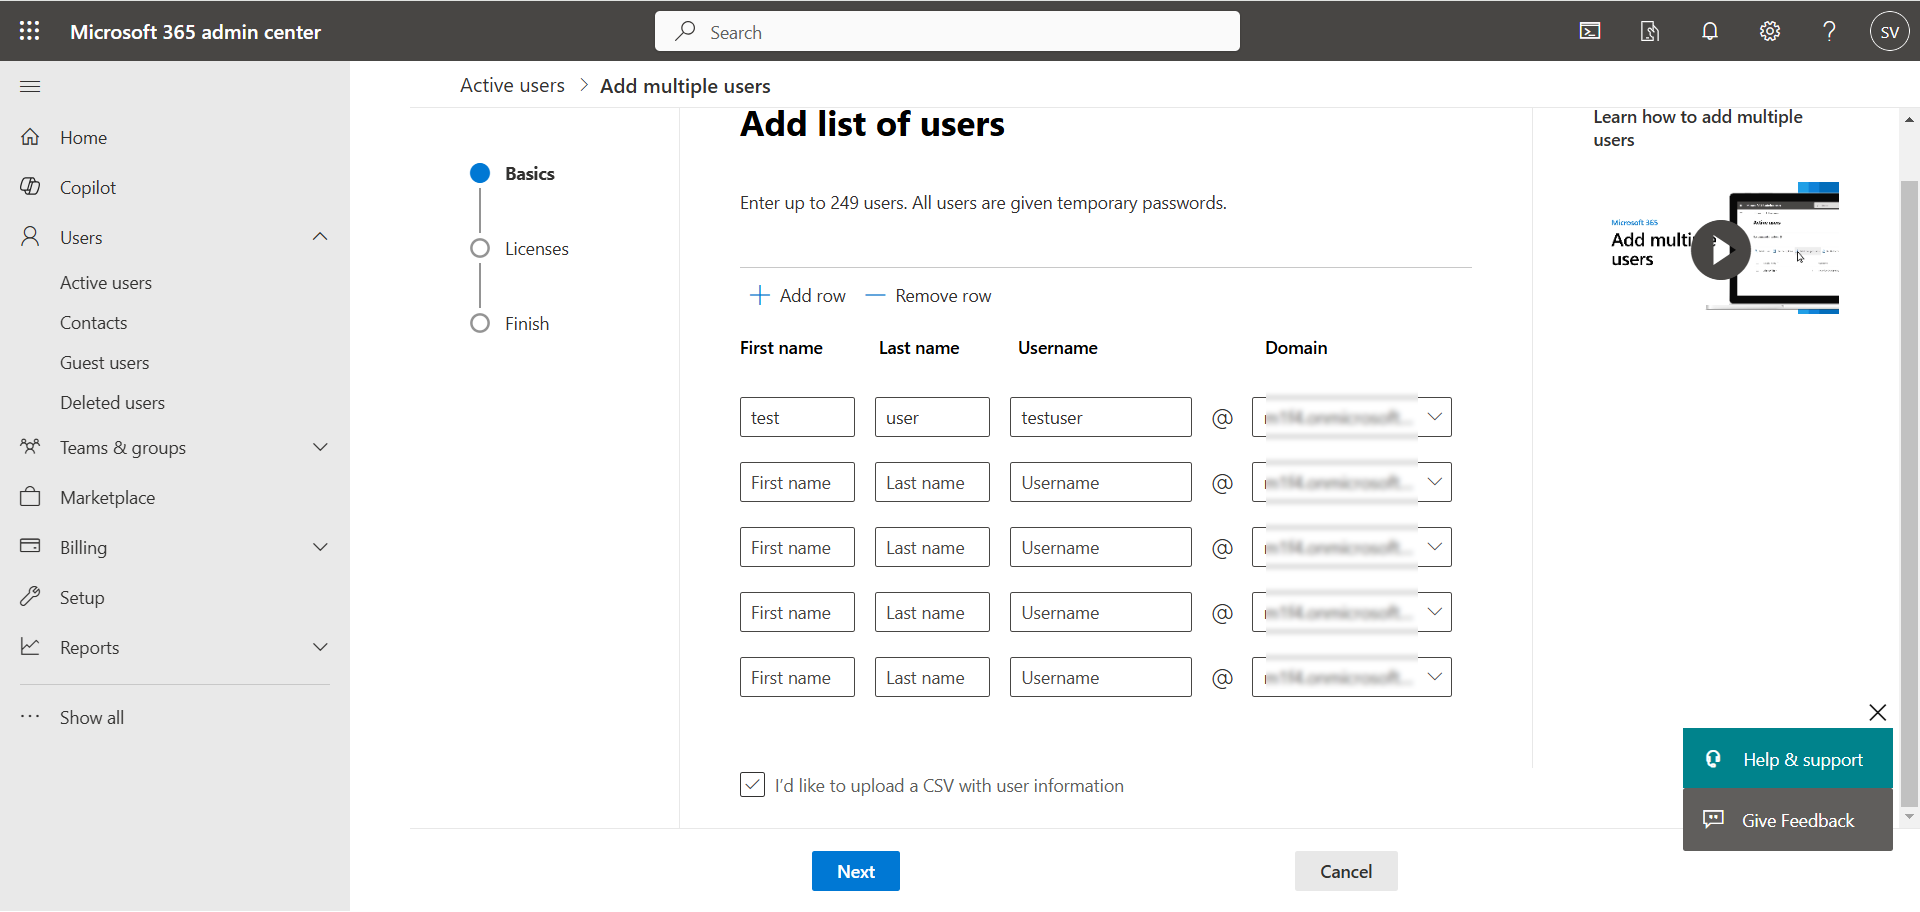
- Upload the completed CSV file and click Next to proceed.
- On the Licenses page, select the licenses you want to assign to the users and click Next.
- Review your selections to ensure all details are accurate, then finish the process by clicking Submit or Finish (depending on the interface).
By following these steps, you can efficiently add multiple users to Office 365, saving time and effort for your organization.
Add Single/Multiple Microsoft 365 user accounts with Microsoft Graph PowerShell
To create user throw PowerShell command, first install the module and import it.
Install-Module -Name Microsoft.Graph -Scope CurrentUser

Import-Module Microsoft.Graph
Authenticate to Microsoft Graph
Connect-MgGraph
Create the User and Password
New-MgUser -DisplayName "Somit Vishwakarma" ` -UserPrincipalName "[email protected]" ` -MailNickName "Somit" ` -GivenName "somit" ` -Surname "Vishwakarma" ` -UsageLocation "IN" ` -PasswordProfile @{ Password = "Password@123"; ForceChangePasswordNextSignIn = $true } ` -AccountEnabled
If you don’t add the password then random password will be generated.
Run the below command to check the available license for your organization.
Get-MgSubscribedSku
Add License to the user
Set-MgUserLicense -UserId "somit@mailsdaddy" -AddLicenses @("<SkuId>")
Note:
- Global Administrator or User Administrator role required.
- Each parameter is required.
Add Multiple User to Microsoft 365 with Microsoft Graph PowerShell
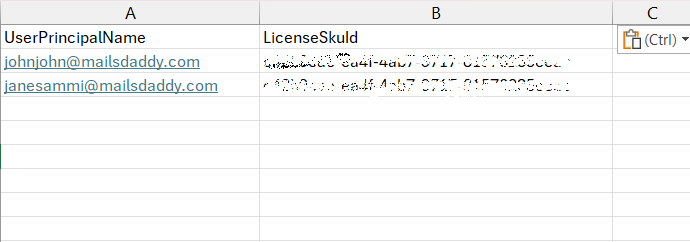
You can also use PowerShell to add multiple users to Office 365 and assign licenses. To do this, you need to create a CSV file containing the necessary user information. Ensure your CSV file includes at least the following properties:
Required Properties for the CSV File
- UserPrincipalName: The username and domain for the user (e.g., [email protected]).
- FirstName: The user’s first name.
- LastName: The user’s last name.
- DisplayName: The full name as it will appear in Office 365.
- LicenseSKUId: Type your SKUId or product code to assign it.
Steps to Add Users with License
- Prepare the CSV File:
- Create a CSV file like:

-
- Save the file with a name like MailsDaddyTeams.csv.
- Connect to Microsoft 365 PowerShell:
- Run the following command to connect PowerShell to Microsoft 365:
#Connect Microsoft Graph
Connect-MgGraph -Scopes User.ReadWrite.All, Organization.Read.All
# To view available license, skuppartnumber and skuid
Get-MgSubscribedSku | Select -Property Sku*, ConsumedUnits -ExpandProperty PrepaidUnits | Format-List
- Use CSV File to Create User and Assign License
Use the following script to loop through the CSV and add users and assign license. Also ensure to change the CSV file location and change SKU part number then run the command.
# Import the CSV file
$users = Import-Csv -Path "D:\users.csv"

# Loop through each user in the CSV file
foreach ($user in $users) {

    # Create a new user
$newUser = New-MgUser -UserPrincipalName $user.UserPrincipalName `
                              -DisplayName $user.DisplayName `
                              -GivenName $user.FirstName `
                              -Surname $user.LastName `
                              -JobTitle $user.JobTitle `
                              -Department $user.Department `
                              -AccountEnabled `
                              -MailNickname ($user.UserPrincipalName.Split('@')[0]) `
                              -PasswordProfile @{ForceChangePasswordNextSignIn = $true; Password = "TempPassword123!"}

# Set UsageLocation (required for license assignment)
Update-MgUser -UserId $newUser.Id -UsageLocation "IN"

# Assign a license to the new user
    $e5Sku = Get-MgSubscribedSku -All | Where SkuPartNumber -eq 'DEVELOPERPACK_E5'
    Set-MgUserLicense -UserId $newUser.Id -AddLicenses @{SkuId = $e5Sku.SkuId} -RemoveLicenses @()
}
By following these steps, you can efficiently add multiple users and assign licenses in bulk using PowerShell.
That’s it.
Check Available License and Subscription via PowerShell
Connect to the M365 then run the command for all subscriptions:
Get-MgSubscribedSku | Select -Property Sku*, ConsumedUnits -ExpandProperty PrepaidUnits | Format-List
How to Unassign the User License in Microsoft Admin Centre?
In the admin center, go to the Billing > Licenses page
- Select a product or Microsoft subscription from where you want to remove
- Go to the user > Click on three dots and click on Unassign license.
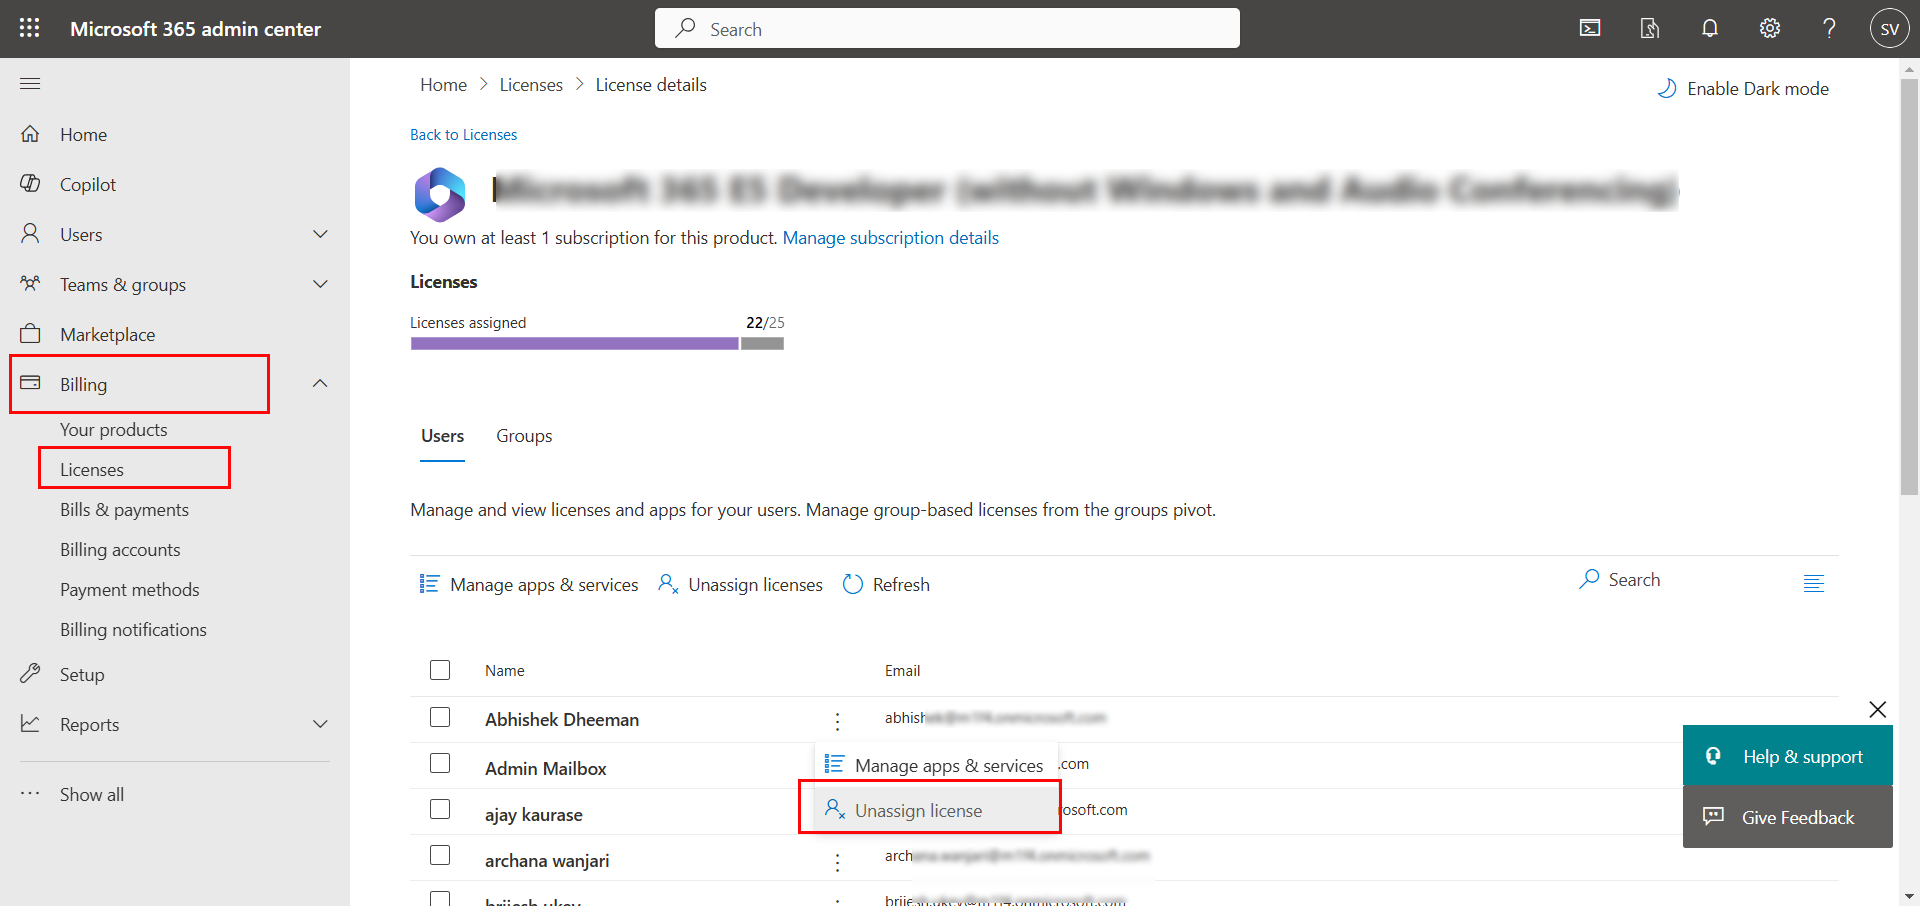
- Follow the window and unassign the license to the user.
You can also assign and unassign the license through: Active users page
PowerShell to Unassign multiple user license
Create a CSV file with UserPrincipalName and SkuId then replace the location of CSV file.
Connect to M365 Graph, replace CSV path then run
# Connect to Microsoft Graph
Connect-MgGraph -Scopes "User.ReadWrite.All"

# Define the CSV file path
$csvPath = "C:\Users\MailsDaddy\Documents\userx.csv"

# Import CSV file
$users = Import-Csv -Path $csvPath

# Loop through each user in the CSV
foreach ($user in $users) {
# Check if the UserPrincipalName and SkuId are valid
if ($user.UserPrincipalName -and $user.SkuId) {
try {
# Remove the specified license from the user
Set-MgUserLicense -UserId $user.UserPrincipalName -AddLicenses @() -RemoveLicenses @([guid]$user.SkuId)
Write-Host "License removed from $($user.UserPrincipalName)"
}
catch { Write-Host "Error removing license from $($user.UserPrincipalName): $_" } }
else { Write-Host "Missing UserPrincipalName or SkuId for $($user)" } }
}
Conclusion
In this post, I have provided a detailed explanation of how to assign and unassign licenses to users in both the Exchange Admin Center and PowerShell. The step-by-step guidance is designed to help you navigate these processes efficiently. If you find this article helpful, please consider sharing it with others who might benefit from this information.
For any additional assistance or to cloud services, feel free to reach out to the MailsDaddy support team.
Read More: