Office 365 is the best-performing cloud-based productivity platform offered by Microsoft & corp. It comes with multiple advanced productivity apps on the cloud which helps to increase the workflow of Office, like – MS Teams, Word, Excel, PowerPoint, Outlook, OneDrive, and so much more. As per the graph of current market research, most businesses and organizations are preferring to use Microsoft 365 because of its cloud service. Moreover, users can work and respond to other clients quickly, anywhere, and anytime
Due to personal requirements, sometimes businesses, organizations, or any users are required to move their mailboxes (like emails, contacts, calendars, etc) from one tenant to another tenant (one domain to another domain) in Microsoft Office 365.
If you want to Process Office 365 Tenant to Tenant Migration, you visited the right place. In this article, I will share the complete information on how you can easily complete cross-tenant migration (One Office 365 mailbox database into another Office 365 account).
How users can Perform Office 365 Tenant Migration?
Microsoft provides the manual procedure to perform Tenant to Tenant Migration in Office 365. I know, this bit lengthy but it can provide you an accurate result and can move your one domain Office 365 Mailboxes to another domain.
Before starting the process, it should have to confirm whether you have to provide Global Admin access or not. After getting complete Global Admin access you can perform O365 to O365 migration. Now let’s start to follow the below processes one by one and move our email mailbox database into another Office 365 mailbox.
Contact Us
Want to migrate your tenant account to another tenant platform? Contact us – We have a dedicated team to handle your Office 365 tenant migration at minimal cost.
Tenant Migration Service
Some Prerequisites for Source and Target Tenants:
Provided Global Admin access:
It should have to confirm whether you have to provide Global Admin access or not. To enable it:
- Go to Admin Center.
- Open Active Users.
- Select User and click on three dots, then select Manage Roles.
- A pop-up will open, select Global Admin and click save.
Create a mail-enabled security group in the source tenant:
A mail-enabled security group is a process that is used to distribute messages and to grant access permissions to resources in Active Directory. For this:
- Go to Office.com and log in with Admin ID.
- Click on Admin to open the Admin Center panel.
- Choose Teams & groups >> Click on Active teams & groups.
- Now in the Active Teams and Group window, press the Security Group button.
- After that choose Add a Mail-enabled Security Group.

- In the open window, under Basic section provide the Name and Description for the Group and hit on the Next.

- Now in the Owner part, you have to assign group owners. Here click on Assign Owners >> Select all the users which you want to make Group Owners >> Click on the Add button.

- After that again in the Owners section choose all owners and press the Next button.

- Now in the Migration section, click on the add members button to select the users whose Outlook mailboxes you want to migrate. After selecting all members, go to Next.

- In the Setting part, provide the email address name and hit on the Next button to proceed further.

- In the Finish section, verify all details and click Create group.

- Now, save the group name and email address in any text message saving file as it will be needed later.
Save the Tenant ID of the source and target tenant
After creating a mail-enable security group in source Tenant, you must find and save the Tenant ID for future processes. To find it,
- Follow the below-listed URL in the source and target account.
https://portal.azure.com/#view/Microsoft_AAD_IAM/ActiveDirectoryMenuBlade/~/Overview
- Now click on the copy icon to copy the Tenant ID and save it separately.

Create the migration application and secret value in the destination tenant
After successfully completing all first processes users have to create an application to find value. Apart from this, users can provide API permission, create new client secrets, and grant admin consent for MSFT. To complete all processes,
Create/register an application
- To register the application, you have to open the Azure AD portal of the target Office 365 account. For this, follow this link https://portal.azure.com and log in with the target tenant admin.
- Click on the View button of Manage Azure Active Directory.
- Select App Registrations to create/register the application >> click on New Registration.

- Now in the Register an Application window, provide the name of the application that you want to create.
- Choose “Accounts in any organizational directory (Any Azure AD directory – Multitenant)”.
- In the Redirect URL section, select Web >> type URL https://office.com/ >> Click on Register.

- Now the process of creation has been started. After successfully creating, it will provide you with all details. Here only copy the Application name and Application (client) ID and save it for future processes.
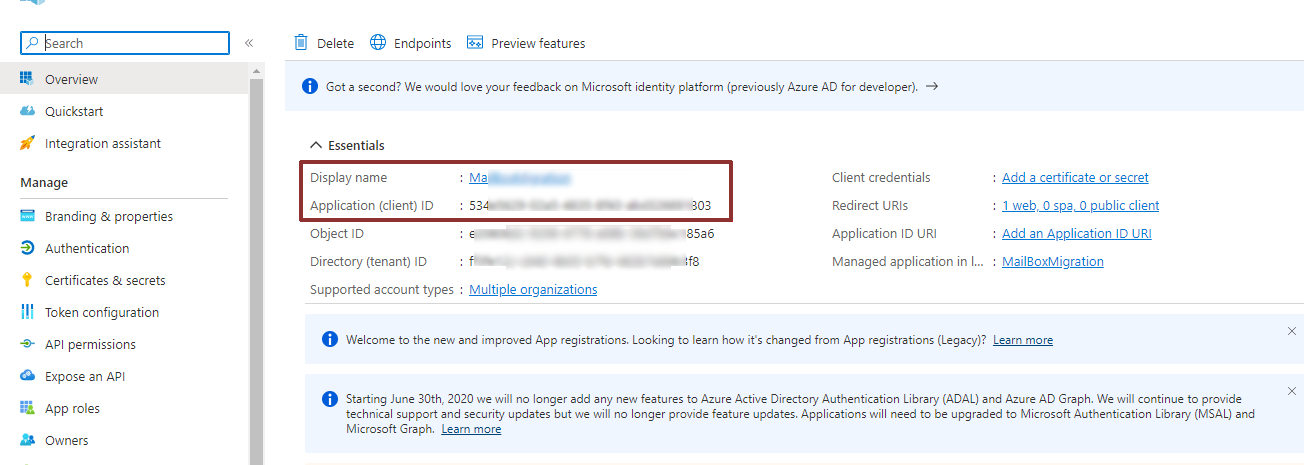
Provide API Permission
After finding the Application name and client ID users have to add Mailbox Migration permission, for this:
- Go to API Permissions in the same App registration window.
- By default, user.read permission already assigned that is not required. You need to remove it. For this click on 3 dots and select Remove Permission.
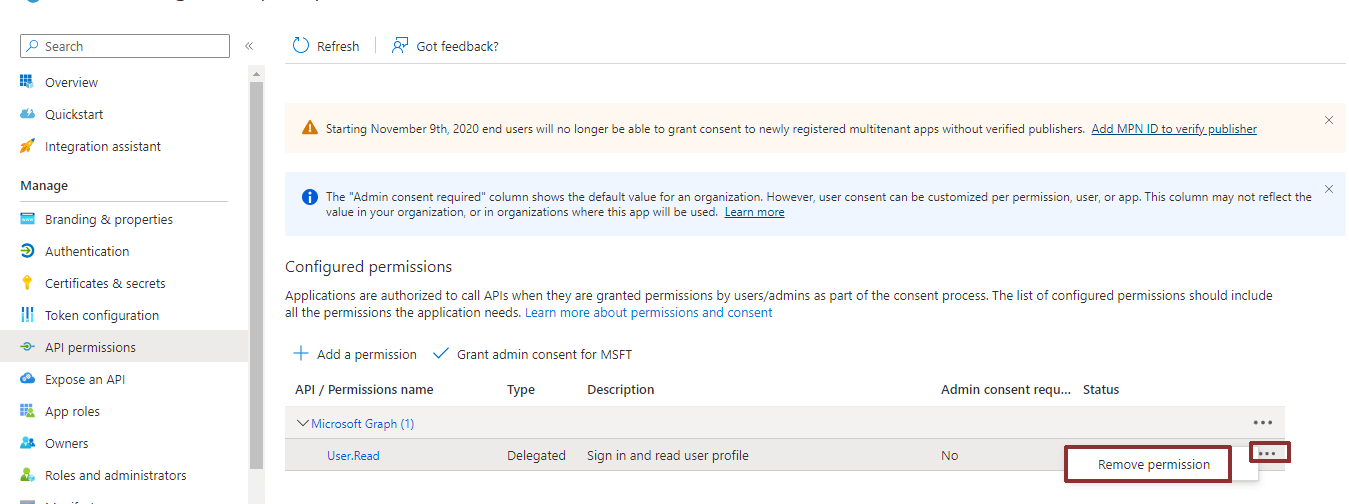
- Click on Add A Permission to create mailbox migration permission.
- Go to APIs my organization uses>> Search for Office 365 in the search box >> Choose Office 365 Exchange Online.

- Click on the Application Permissions >> Search Mailbox in the search mailbox >> choose Mailbox >> Enable Mailbox.Migration >> Press the Add Permissions button.

Add New Client Secret
- Now in the same window select Certificated & secrets >> Click on New client secret

- Type the description for the client secret and press the add.

- Now a client secret has been created. Copy the secret value and save it.
Grant Admin Consent for MSFT
After getting Clint’s Secret Value, you need to Grant Admin Consent for MSFT. For that:
- Again, go to the Azure Active Directory panel >> click on the Enterprises Applications >> Click on the Application that you created earlier.

- Choose Permissions >> Click on Grant Admin Consent for MSFT.

- Now a new window will be open for confirmation, here directly click on the Accept button.
- Refresh the page and verify whether the permission was granted through admin consent or not.
Manage Exchange Online migration endpoint and organization relationship in the Target Tenant
To complete this process, users must use PowerShell and follow the below-listed details:
- Search PowerShell in your system to select Windows PowerShell and run it as an administrator.
- In PowerShell, first, we start with execution policies for Windows computers. By default, it was set as restricted. To unrestricted the execution policies run this command:
Set-ExecutionPolicy Unrestricted
- After running this command, it will ask for permission. Here Type Y and press the Enter button.

- Now you have to connect to the Exchange Online PowerShell. For this, first, you have to install the Exchange Online module. For this, run this command:
Install-Module -Name ExchangeOnlineManagement
- After installing you have to import the Exchange Online module in PowerShell. For this:
Import-Module ExchangeOnlineManagement
- Now Connect to Exchange Online PowerShell with the Target account by entering this command:
Connect-ExchangeOnline
- After entering this command an Office 365 logging Window will be open. Here put the destination account sign-in details and click on the Sign-In button.
- Now to create new migration endpoint for tenant-to-tenant migration run this command after putting, the Application ID, Client Secret Value, and Migration End Point Name in the below code
# Enable customization if tenant is dehydrated
$dehydrated=Get-OrganizationConfig | select isdehydrated
if ($dehydrated.isdehydrated -eq $true) {Enable-OrganizationCustomization}
$AppId = "[ Application ID]"
$Credential = New-Object -TypeName System.Management.Automation.PSCredential -ArgumentList $AppId, (ConvertTo-SecureString -String "[Client Secret Value]" -AsPlainText -Force)
New-MigrationEndpoint -RemoteServer outlook.office.com -RemoteTenant "[sourcetenant.onmicrosoft.com]" -Credentials $Credential -ExchangeRemoteMove:$true -Name "[ Migration End Point Name]" -ApplicationId $AppId

- Now make or edit the organization relationship with your source tenant by putting the below command in the target tenant PowerShell.
- Please run this command after putting [Tenant ID that you create in source ID] and [Provides new organization relationship Name]. Please also save the relationship name for future requirements.
$sourceTenantId="[Tenant ID that you create in source ID]"
$orgrels=Get-OrganizationRelationship
$existingOrgRel = $orgrels | ?{$_.DomainNames -like $sourceTenantId}
If ($null -ne $existingOrgRel)
{
Set-OrganizationRelationship $existingOrgRel.Name -Enabled:$true -MailboxMoveEnabled:$true -MailboxMoveCapability Inbound
}
If ($null -eq $existingOrgRel)
{
New-OrganizationRelationship "[Provides new organization relationship Name]" -Enabled:$true -MailboxMoveEnabled:$true -MailboxMoveCapability Inbound -DomainNames $sourceTenantId
}
Accept the migration application and configure the organization relationship in the Source Tenant
- First login into the source Office365 Admin account.
- Now run the below URL in your source account sign-in browser after inserting your source tenant in the place of (sourcetenant.onmicrosoft.com) and putting the application id in place of [application_id_of_the_app_you_just_created].
https://login.microsoftonline.com/sourcetenant.onmicrosoft.com/adminconsent?client_id=[application_id_of_the_app_you_just_created]&redirect_uri=https://office.com
- Click on Accept button to accept the application invitation permission.
- Now again open another PowerShell as an administrator for Source Tenant.
- Run the below command one by one as I share in above:
Install-Module -Name ExchangeOnlineManagement
Import-Module ExchangeOnlineManagement
Connect-ExchangeOnline
- After running the third command put the source tenant sign-in details and hit the Sign In button
- Once your source id is connected with PowerShell create a new organization relationship using the below command:
$targetTenantId="[Tenant ID of the target tenant]"
$appId="[application id]"
$scope="[email address of the mail enable security group]"
$existingOrgRel = $orgrels | ?{$_.DomainNames -like $targetTenantId}
If ($null -ne $existingOrgRel)
{
Set-OrganizationRelationship $existingOrgRel.Name -Enabled:$true -MailboxMoveEnabled:$true -MailboxMoveCapability RemoteOutbound -OAuthApplicationId $appId -MailboxMovePublishedScopes $scope
}
If ($null -eq $existingOrgRel)
{
New-OrganizationRelationship "[organization relationship name]" -Enabled:$true -MailboxMoveEnabled:$true -MailboxMoveCapability RemoteOutbound -DomainNames $targetTenantId -OAuthApplicationId $appId -MailboxMovePublishedScopes $scope
}
Note: Run this command after putting the Tenant ID of the target tenant, application id, email address of the mail enable security group, and organization relationship name.

Create Mail Users in Target Tenant
Now you have to create the user mailbox in the target tenant so that the mailbox can be transferred. For this.
- Go to the Admin Account of the target tenant >> Click on Exchange to open Exchange Admin Center.
- Go to Recipients>> Select Contacts >> Click on Add a Mail User.

- Now a New Mail Users window will be open. Here put users details, like, first name, last name, display name, etc. In “external email address” provide your source user email address which data you want to move into this account. After providing all the details, click on Next.

- Now verify all details and click on Create button.
Find and Add ExchangeGuid and ExchangeLegacyDN of the source mailbox into the target Mailbox
After creating the user account in the target tenant, you have to find Exchange and add ExchangeLegacyDn of the source mailbox into the target mail user. For this:
Find ExchangeGuid and ExchangeLegacyDN of the source mailbox
- Run the below command in your source tenant PowerShell after entering the source tenant email ID.
Get-Mailbox [put source tenant email id] | fl Name,ExchangeGuid,LegacyExchangeDN
Note: Please copy and save the ExchangeGuid and ExchangeLegacyDN of the users one by one.

ADD ExchangeGuid and ExchangeLegacyDN of source mailbox Into Target Account
- To add ExchangeGuid, enter the below command in the Target user PowerShell. Please run this command after entering the email address of the Target user and ExchangeGuid of the source user.
Set-MailUser -Identity [Target user email address] -ExchangeGuid [Source user ExchangeGuid]

- To add ExchangeGuid, enter the below command in the Target user PowerShell. Please run this command after putting the email address of the Target user and LegacyExchangeDN of the source user.
Set-MailUser -Identity [Target user email address] –EmailAddresses @{add="x500:[Source user LegacyExchangeDN]"}
Test Migration Server Availability
- To test it run the below command in the target tenant PowerShell after providing the name of your migration endpoint and the Primary SMTP of Mail User object in target tenant. If you are doing anything wrong in the above process, this command will show the status as failed.
Test-MigrationServerAvailability -EndPoint "[the name of your migration endpoint]" -TestMailbox "[Primary SMTP of Mail User object in target tenant]"
Assign License to the mail users in Target Tenant
- In the source tenant of Admin Center select Users >> Click on the active users >> tick that user to created >> click on three dots (…) >> Hit on Manage Product Licenses.
- Now a new window (Manage Product Licenses) will appear. Here select Replace >> Select the license>> Click on the save changes.
Create Migration Batch in Target Tenant
After assigning the license you have to create the migration batch in the target tenant to process Office 365 Tenant to Tenant Migration. For this,
- Open target tenant Admin Center >> Click on Show All >> Hit on “Exchange” to open the exchange admin center.
- Now in Exchange Admin Center select “Migration” >> Click on “Add migration batch“.
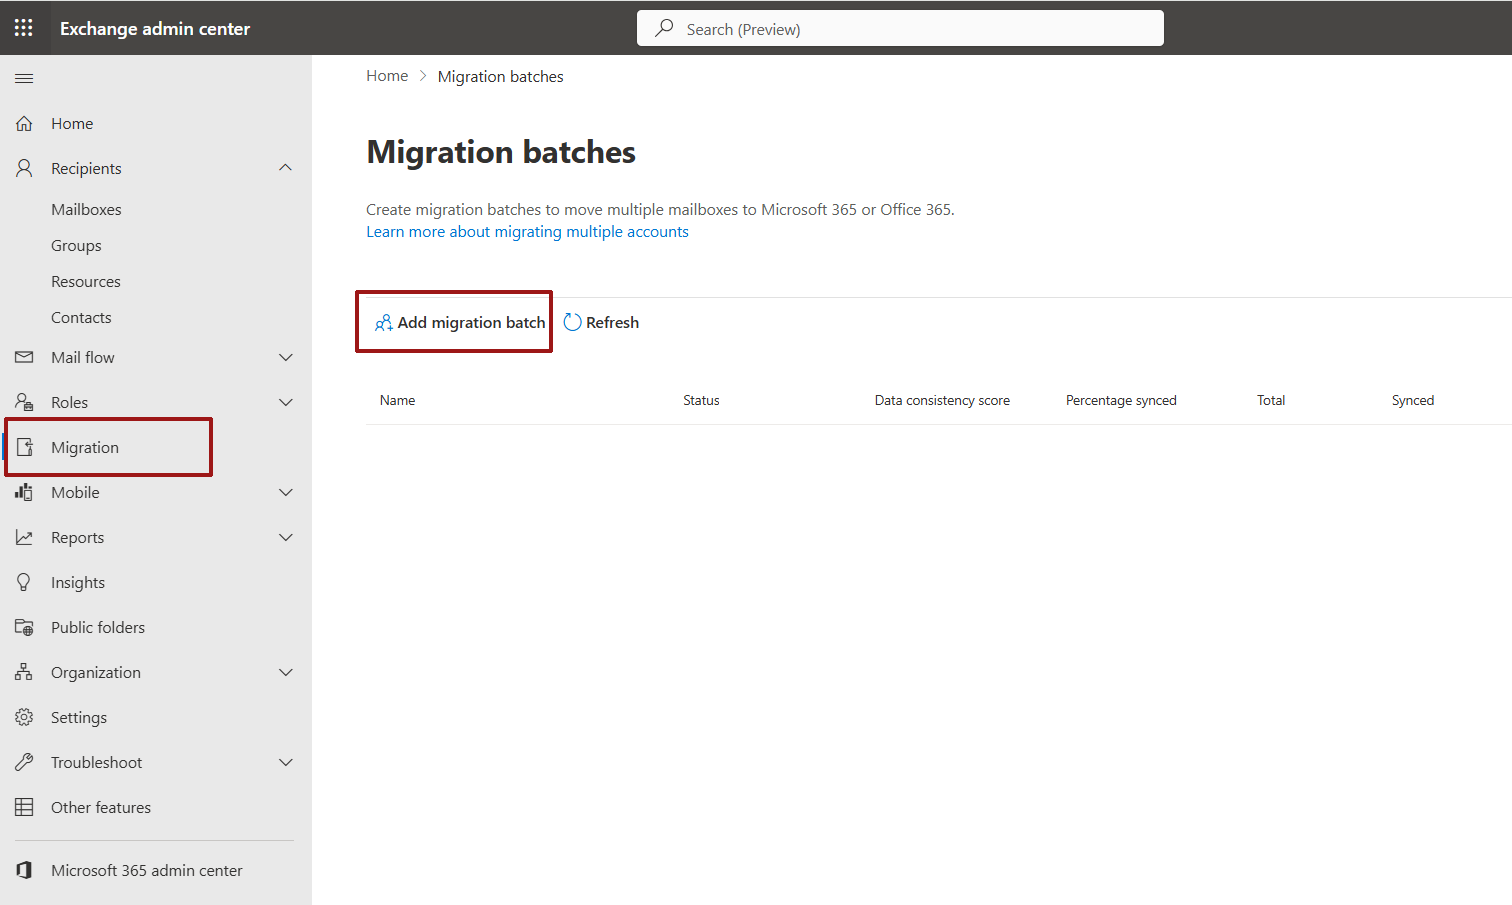
- Now a window Add migration batch will be open that is divided into 7 sections.
- In the Migration Path part, put any migration bath unique name >> Choose Migration to Exchange Online in the mailbox migration path >> Press the Next button.
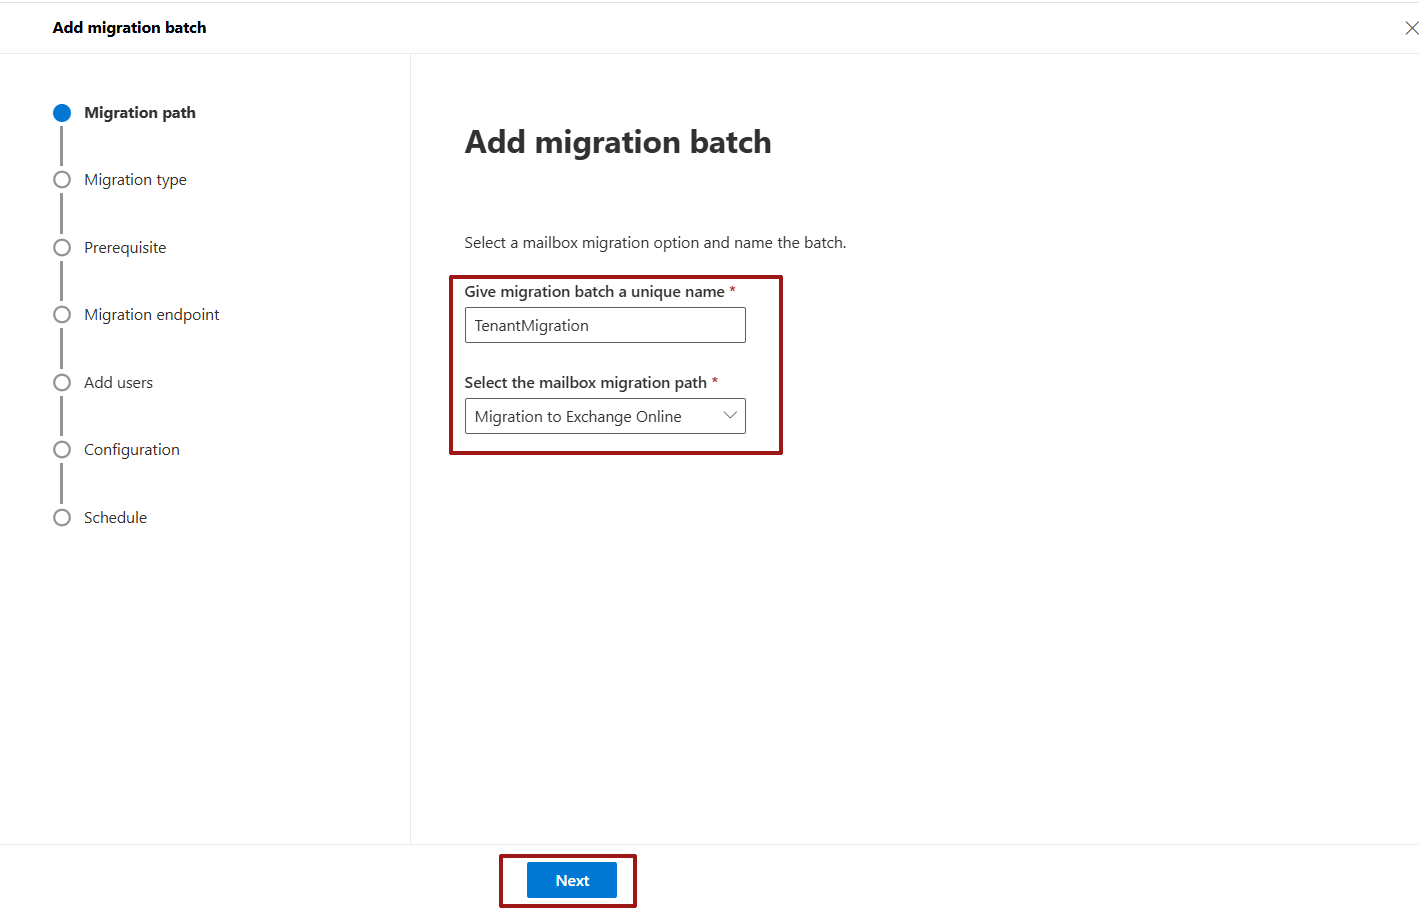
- Now in the Migration Type section, select Cross tenant migration and click on Next

- In the prerequisites part, you have to read and confirm all prerequisites for cross-tenant migration. As we have completed all these steps earlier so directly click on Next.
- Now select the Migration Endpoint which you created and go to Next.

- In Add User section import the CSV File. In the CSV file you have put target Tenant email Ids. Sample CSV file is shown in the image:
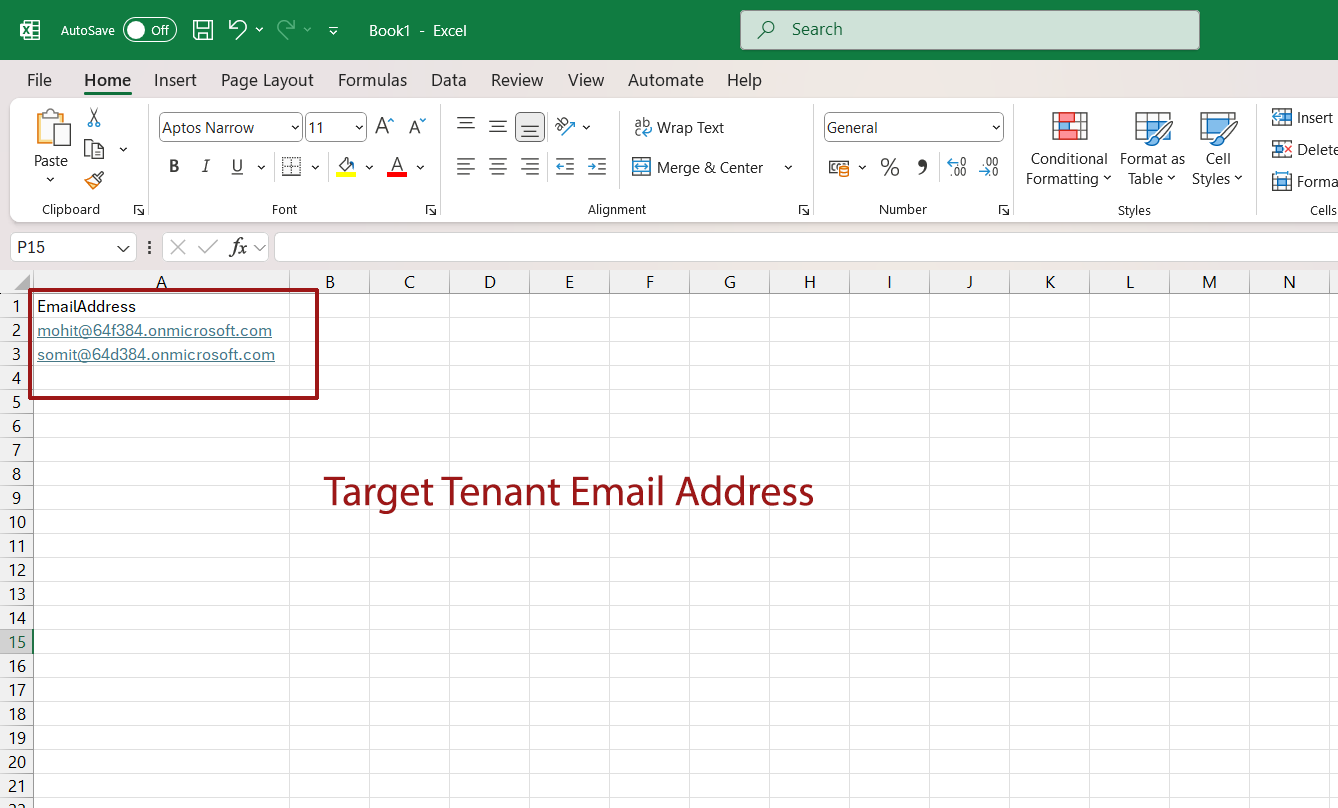
- After creating a CSV file, click on Import CSV file to add the created CSV file >> Press the Next button.

- In the configuration section, put your target delivery domain and go to Next.

- In the Schedule migration part, Select the mailbox where the migration report will be moved>> Choose “Automatically start the batch” and “Automatically complete the migration batch” >> Select your Time Zone and click on Save.

- Now a batch created successful message will appear, click on Done here.

- Now in the Migration Batch window, you can see that the migration batch has been created and data syncing has started.
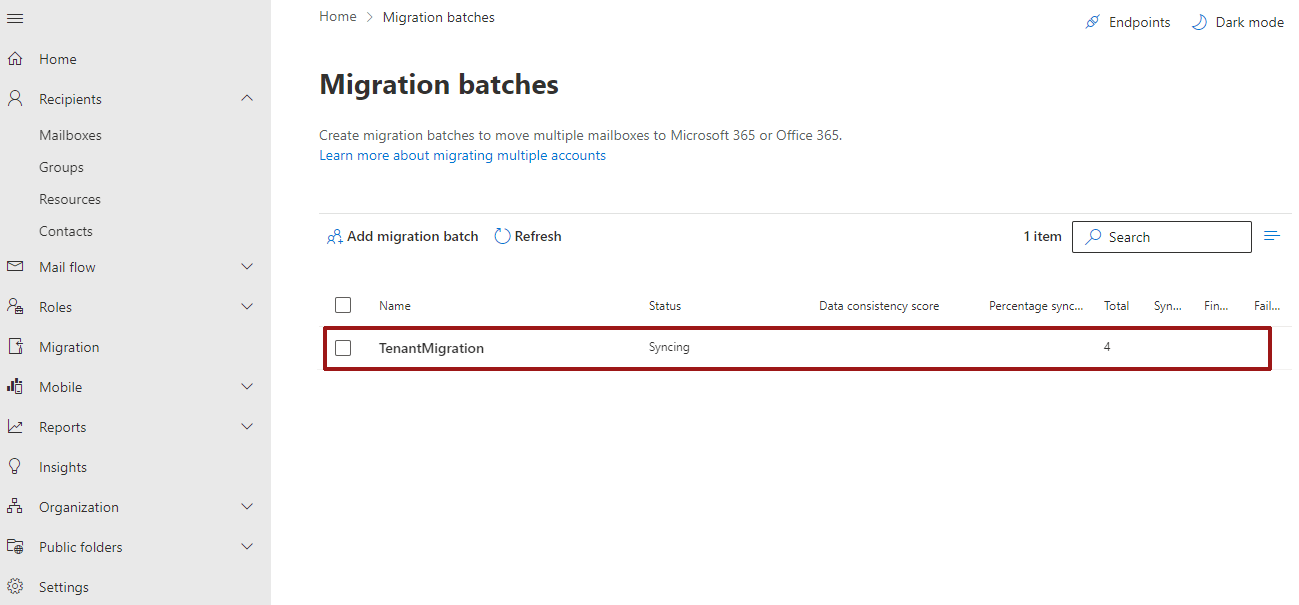
- You can check the status of data syncing by clicking on the Refresh button. When all the data is synchronized the status will appear as Completed.
- That’s it.
I hope the steps above help users at all levels successfully perform cross tenant migration on their own. We understand that this process can be complex, time-consuming, and requires professional expertise. That’s why this step-by-step office 365 tenant migration guide has been carefully crafted to assist both individual users and organizations throughout the process.
At The END
Office 365 tenant to tenant migration is a crucial process for businesses that need to transfer data between tenants—whether it’s due to company mergers, acquisitions, or moving a user’s data. This guide is designed to be user-friendly, so individuals at all levels can easily follow the steps for a seamless cross-tenant migration.
If you require further assistance or need expert help with the migration, feel free to reach out to the MailsDaddy support team. We’re available 24/7 to assist you with different tenant platform including Office 365 Tenant migration.
Also Read


Pingback: What is Windows 365 and How to use it?